Seeing as I’ve been sicker than a dog these past couple of days, Mr. Guilty promised me that he would tackle tonight’s menu item all by himself. I do have to commend him for offering, as Mr. Guilty usually steps foot in the kitchen for two reasons only, a bowl of cereal or a snack.
As there are boxes piled up all around us, it is getting a lot harder to work in our small space as well. I’ve packed all but the necessities from the kitchen (I might need my loaf pan or mortar & pestle in the next 3 days!). I have barely anything left to work with…so I had something fairly easy planned for the evening, Eggplant Neapolitan. Layers of eggplant topped with a homemade tomato based sauce. What could be more simple?
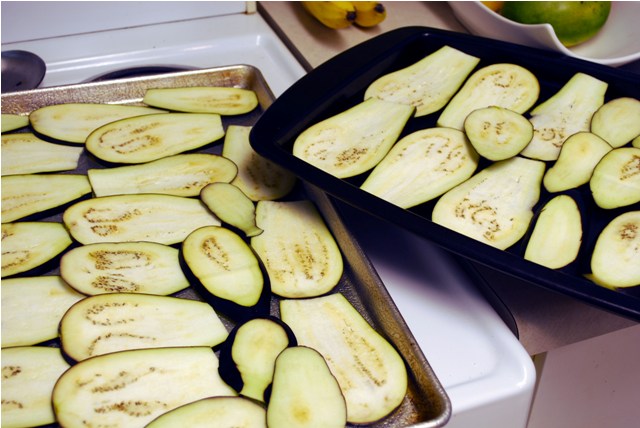
I know he feels intimidated when he’s in the kitchen with me. And who wouldn’t? I just can’t handle seeing someone cooking differently than me, or slower than me, or in my kitchen. I always end up stepping in and just doing it myself. God help me when our little man is old enough to want to help, I’m sure he’ll regret it. Let’s all give kudos to Mr. Guilty, he put in a good effort! He grilled that eggplant just as I asked.
I did the rest….
Oh well, even when I’m sick, I still love to cook. As long as he gets me a big ol’ mug of NeoCitron before bed, then life is good.
This is a very simple dish, uses many vegetables that are in season right now and takes less than an hour to prepare. Feel free to add zucchini or even replace the eggplant with zucchini, it would work quite well in this dish. I recommend it to anyone who wants to teach their children (or anyone else) the basics. Learning to make a basic tomato sauce is something everyone should know how to do.
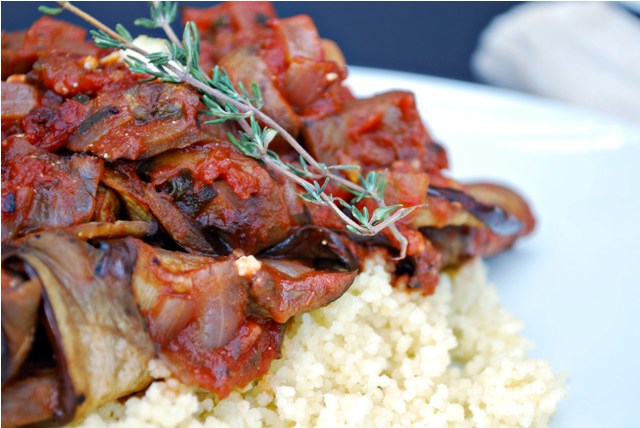
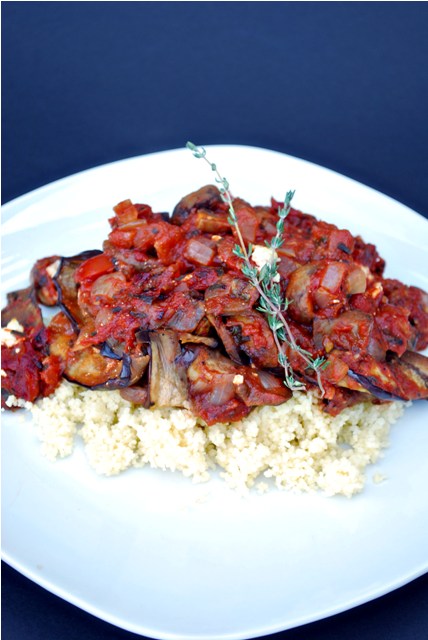
Eggplant Neapolitan with Cous Cous
3 small Eggplants (Aubergine)
Salt & Pepper
4 Medium sized tomatoes, dice
1/3 cup fresh herbs (I used chives, oregano, basil and thyme), minced
10-12 large mushrooms, diced
1 large vidalia onion, diced
1 clove of garlic, grated
1 6oz can of tomato paste
Salt & Pepper
2 oz soft goat cheese (chèvre)
2 cups low sodium chicken broth
1 1/2 cups cous cous
1. Remove tops from eggplants. Slice vertically into very thin pieces (approximately 1/8″).
2. Line a baking tray with eggplant slices and spray with baking spray or brush with oil. Season with salt and pepper.
3. Grill on a very hot BBQ until grill marks appear, flip and repeat.
4. Remove from grill and return to baking tray. Set aside.
5. In a large, deep saucepan, add garlic, onion, mushrooms and herbs. Sauté until vegetables begin to soften.
6. Add tomatoes and can of tomato paste. Season with salt and pepper.
7. Continue to sauté for another 10-15 minutes.
6. Oil an oblong baking dish and line the bottom with your eggplant. Overlap each slice with the next to prevent the sauce from seeping through.
7. Next, pour a layer of sauce over your eggplant.
8. Crumble some goat cheese over your layer and repeat as many times as you have eggplant and sauce for. I had three layers.
9. Bake in a 375°F oven for 40 minutes.
10. For the cous cous, boil your broth and add in cous cous. Remove from heat, stir, put the lid on it, and let stand 5 minutes. Fluff with fork before serving.
11. To serve, place a large scoop of cous cous on plate and top with a portion of eggplant Neapolitan. Bon appétit!
This weekend is drawing ever closer, and if you are a loyal reader of Guilty Kitchen, than you know that moving day is drawing near. We have oodles of family coming in as of tonight, a wedding tomorrow and then last minute packing to do on Sunday and Monday. I do have a few things planned as far as menu items go (a famous flavour of David Lebovitz ice cream among them), so stay tuned for those, but don’t get on my back if posts wane for a few days. I know you’ll stick with me right?
Right?
You’ll be back…

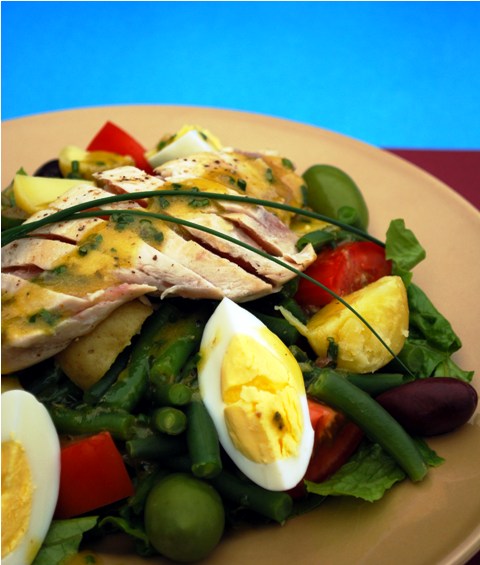
This salad has it’s history. If you are keen on knowing it, you will have to look elsewhere. Like the great Caeser salad, Waldorf salad, Panzanella salad and others like them, what once may have been an original masterpiece, has, over the years, become something more of a personal masterpiece for anyone making it. Some people prefer their Niçoise with canned tuna, or without potatoes, or with artichoke hearts, or anchovy fillets. Well, everyone has their preferences. This is my take on a classic salad.
This dressing is basically my Caesar dressing without the egg, worcestershire or parmesan. It remains a creamy vinaigrette and adds a salty, tangy bite to this dish.
Dressing
1 clove garlic, minced
1 tsp anchovy paste (or 2 small diced anchovy fillets)
1 Tbsp Dijon mustard
1 Tbsp Capers, chopped
1 Tbsp red wine vinegar
1 tsp. caper brine
1 Tbsp fresh chives, chopped
juice of 1/2 a lemon
salt and fresh cracked pepper
3/4 cup extra virgin olive oil
1. In small bowl, combine garlic, anchovy, Dijon and capers.
2. Mix in vinegar, caper brine, lemon juice and salt and pepper.
3. Drizzle the olive oil in, whisking as you go.. You are trying to emulsify the dressing in this step.
4. When all is combined, stir in the chopped chives.
For the Salad
2 Sashimi grade tuna steaks (I used albacore)
5 small yukon gold potatoes (you could use any small potatoes here)
2 cups green beans, cut into 1-2 in chunks (or haricots vert if you want to get fancy)
2 medium sized tomatoes
2 large eggs, hard boiled
3 cups romaine leaves, torn into pieces
12 olives ( I used kalamata and cerignola)
salt and pepper to taste
olive oil for searing
1. Boil potatoes until fork tender, approximately 30 minutes (depends on the size of yer taters). When done, drain water and set aside, (you want them to still be warm for the salad).
2. Steam green beans until al dente, about 5 minutes. Quickly run cold water over to stop them from cooking, and set aside.
3. Cube tomatoes and set them aside as well.
4. Dress plates with romaine, tomatoes and beans.
5. Drizzle olive oil on your tuna steaks, season with salt and pepper and get your pan ready. You need a heavy bottomed or non stick sauce pan. Heat on high until almost the smoking point. Sear tuna steaks quickly on both sides, leaving the tuna a blue rare.
6. Cube potatoes and add to salad base. Quarter your hard boiled eggs and scatter them on the salad as well. Place olives around edges.
7. Slice tuna steaks on a diagonal tilt, and place on salad. Drizzle dressing over the whole thing and serve!
I’ve been wanting to create a really great, out of this world pizza for a long time. I’ve made pizza’s from scratch many times, but I’ve only hand made the crust once or twice (is in measured out ingredients myself instead of dumping a bag of premixed into a bowl and adding water). In years past, we used to hold a little get together for the Grey Cup (that’s the Canadian Football League’s “Super Bowl” if you will, although we’re in our 97th year of celebrating it) and have a big ol’ pizza party. Everyone brought ingredients to contribute and we always made giant pizzas piled high with so many toppings it was my own little mountain of cheesy goodness.
Well, I didn’t want to drown in greasy cheese last night. No. In fact, I wanted my pizza to be refreshing, in season and different. No tomato sauce, no mozzarella, and I really needed to use those figs I bought for the BSI. Not that I am entering my own contest, that would be silly. Yay! I win! Ha ha…kidding…
Anyway, on to the pie.
This is my version of a blend of ingredients, I’m sure, has been done many times before. Not by me mind you, and I did come up with it all by myself. Years in commercial kitchens do that to do, your brain will forever be ingrained with flavours that go well together. Salty with sweet, crunchy with creamy, fruits with meats, etc.
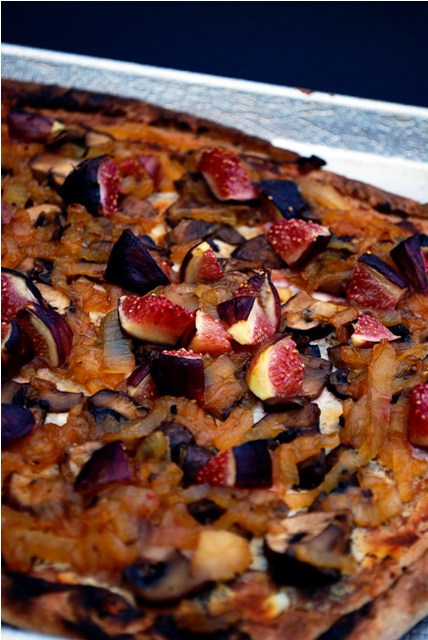
This pizza blends some of my favourite flavours together into one magnificent pie and also allowed me to use some truffle oil that’s been in my cabinet for a couple of months, begging me to use it in something. So there you go, now go make this pizza, you will not be sorry.

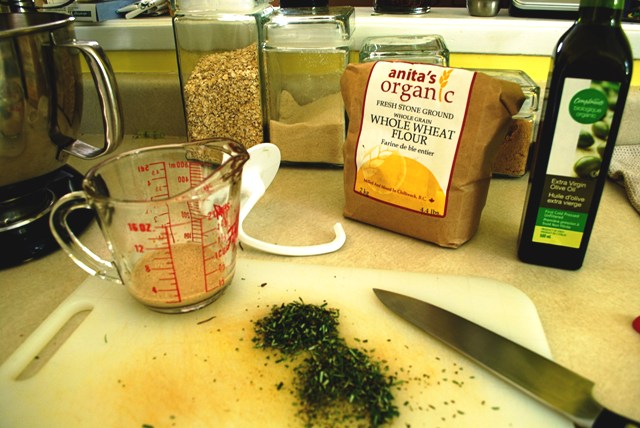
Caramelized Onion, Fig, Mushroom and Goat Cheese Pizza With Truffle Oil on a Grilled Whole Wheat, Rosemary Thin Crust…whew!
For the crust :
(makes one large rectangle crust)
1/4 cup warm water
2 tsp active dry yeast
1 tsp sugar
2/3 cup water, room temperature
1 Tbsp olive oil
2 cups whole grain whole wheat flour
3/4 tsp salt
1 1/2 Tbsp fresh rosemary, finely chopped
baking spray, butter or other fat (for greasing your bowl)
1. Place 1/2 a cup of water in a small bowl or glass measuring cup. Sprinkle in yeast and add tsp. of sugar, stir and let rest 5-10 minutes.
2. Add room temperature water and olive oil to yeast mixture, stir.
3. Place flour and salt in bowl of electric mixer, fitted with paddle attachment. Mix on low for a few seconds.
4. Slowly pour yeast mixture into flour, mixing on low speed. Mix until dough begind to form and sides of bowl are clean. Rest for 5 minutes.
5. Meanwhile, change out the paddle attachment, for the dough hook. Mix for another 5-10 minutes, or until dough becomes smooth and elastic.
6. Oil a medium sized bowl, plop dough ball in, cover in plastic wrap and let rise for 1 1/2 to 2 hours in a warm place.
7. Punch down, roll out into a rectangle and fold edges in on themselves to make a small crust.
For the toppings:
1 large sweet onion (Vidalia, Walla Walla, etc)
1 tsp olive oil
1 12 oz bottle of amber (or darker) beer (minus three or four swigs for the chef!)
salt & fresh cracked pepper
2 Tbsp brown sugar
2 cups brown mushrooms, sliced
2 cloves garlic
1 tsp olive oil salt and fresh cracked pepper
2 fresh black mission figs, diced
2 oz. fresh goat’s cheese (chèvre)
sprinkling of black or white truffle oil
1. Peel onion, cut in half from top to bottom, slice into thin half moon slices.
2. In large, heavy bottomed saucepan, add oil, onions, s & p and sugar.
3. When onions have begun to soften, begin adding beer about a 1/4 cup at a time. Allow liquid to cook out completely before adding more. Esentially, you are deglazing the pan over and over again.
4. When all the beer is gone and pan has been deglazed a final time, set onions aside.
5. Slice mushrooms and grate, mince or crush up your garlic cloves. I’m not picky…
6. Add mushrooms and garlic, plus 1 tsp olive oil into saucepan (you could use the onion pan if you don’t want to clean more than one, I know that’s what I would do).
7. Sautée until mushrooms are fully cooked, set aside.
8. Assemble your Mise en Place. Like this:
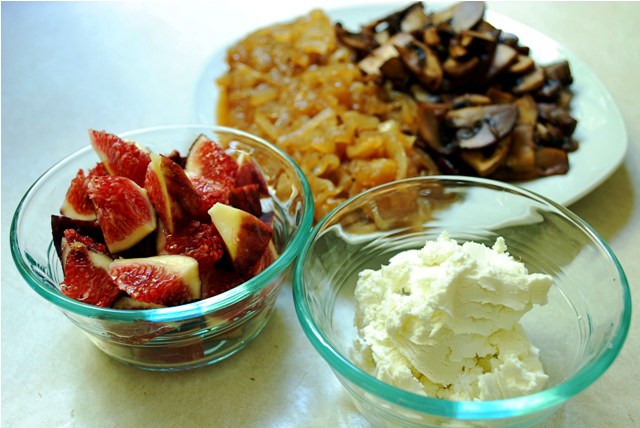
Time to get grilling!
1. Heat your grill to almost high. Brush olive oil onto the top of your crust (the side your toppings will eventually rest on). Toss onto oiled grill for 3-5 minutes.
2. Oil the bottom as the crust is grilling. When ready, flip over and grill the other side for another 3-5 minutes. Be gentle when flipping!
3. When done, remove to large baking tray.
4. Take your goat’s cheese and rub it all over the crust, kind of like a sauce. The heat from grilling will melt the cheese a bit and make it easier to spread.
5. Sprinkle on your onions, mushrooms and figs and more goat’s cheese if you want.
6. Here is where you can do two things to finish your pie. 1) Return to grill on medium heat and bake until cheese is melted and crust is golden and crispy OR 2) Set in 450-500°F oven and bake for about 10 minutes. Either way is fine.
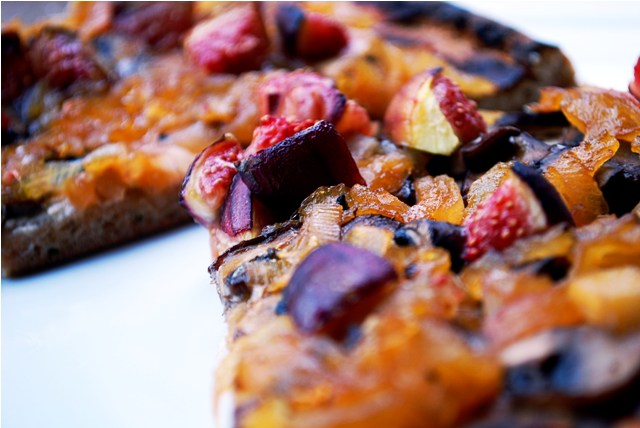
7. When your pizza is ready, drizzle truffle oil over (not too much), cut into 8 pieces and serve. Delicious!
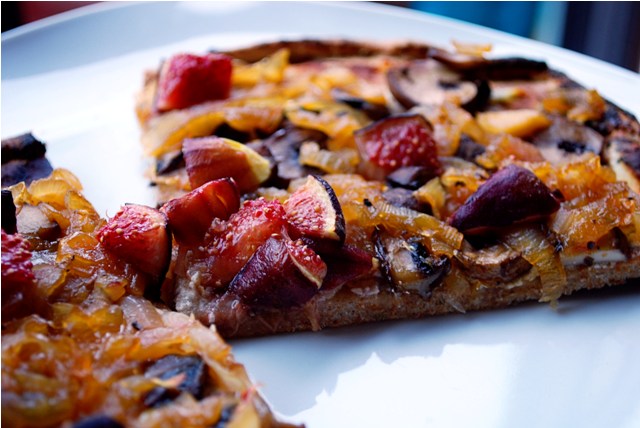
I’m not going to lie. When I first flipped my pie over on the grill, I grabbed one side with tongs and the other with a spatula and attempted to flip it over. Well, I’m sure you can guess what happened next. I tore part of that crust just about clean off! So watch out when you flip it the first time, if it’s not quite cooked yet, it will be soft still and may tear. Good luck!

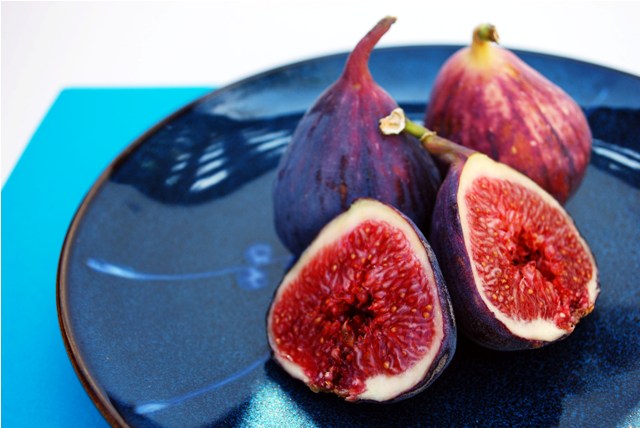
FIGS!
Kim, from Ordinary Recipes Made Gourmet e-mailed me to ask if I wanted to host this week’s Blogger Secret Ingredient. Well, I couldn’t say no…I have a bad habit of doing that. What was I thinking???? Not only am I moving this week, my cousin is getting married on Saturday as well! Oh the trouble I get myself into.
I picked delicious, dainty figs because, a) I love them and b) they are in season right now. There are endless possibilities when it comes to figs. You can use all different kinds, salty or sweet, hot or cold, dessert, main or appy, fresh or dried….you name it and you can do it with figs!
Here are some random facts (via Wikipedia) about cute, little figs:
- The edible fig is one of the first plants that were cultivated by humans.
- Figs are one of the highest plant sources of calcium and fiber.
- Although commonly referred to as a fruit, the fig fruit is actually the flower of the tree.
So, if you want to participate using Figs as this week’s secret ingredient, please submit your recipes. Be aware that I AM moving this weekend (Sunday through Monday), which means my computer will be disconnected for a time come then. I will do my best to make sure everything is done on time, but please keep in mind that things will most likely be a little on the late side.
You can either submit your recipe by commenting (below) and leaving a link to your blog post (your post should link back to this post, or to my blog) OR you can e-mail it to: elizabeth [at]guiltykitchen [dot] com
I’ll reply back to your post once I receive it.
Deadline: Please submit recipes before 9:00 PM (Pacific Standard Time) on Sunday, August 30th. There will be a round-up of everyone’s posts on Monday, September 1st (sometime later in the day). The winner will also be announced on Monday along with next week’s host site.
Your time starts… NOW!
A RT on Twitter would be much appreciated so you can let others know about the challenge…
This is a list of other Challenge Hosts & Ingredients (this is week 45). Be sure to be a friendly food blogger and check out all of the other blogs!
Week 44: Ordinary Recipes Made Gourmet – Peanut Butter
Week 43: The Sophisticated Gourmet – Brown Sugar
Week 42: My Kitchen Addiction – Lime
Week 41: Nutmeg Nanny – Coffee
Week 40: Chaya’s Comfy Cook – Broccoli
Week 39: Healthy Delicious – Plums
Week 38: Zoe – Feta
Week 37: ChezWhat– Potatoes
Week 36: Cinnamon, Spice & Everything Nice – Blueberries
Week 35: Girlichef -Greens
Week 34: The Ungourmet – Watermelon
Week 33: Bread + Butter – Bell Pepper
Week 32: Burp and Slurp -Corn
Week 31: Say Yes to Salad – Kabocha
Week 30: Thinspired – Bananas
Week 29: To Be The Whole Package – Almonds
Week 28: Kristas Kravings – Lemon
Week 27: From French Fries To Flax Seeds – Coconut
Week 26: Plentiful Plants – Avocado
Week 25: Training Fuel – Eggs
Week 24: Dinner at Christina’s – Cabbage
Week 23: Hey What’s for Dinner, Mom? – Strawberries
Week 22: One Bite at a Time – Basil
Week 21: Just Sweet Enough – Black Beans
Week 20: What I Ate Yesterday – Kale
Week 19: What’s for Dinner – Orange
Week 18: BranAppetit! –Spinach
Week 17: Tales of Expansion Dates
Week 16: Biggest Diabetic Loser – Zucchini
Week 15: Sweet & Natural –Peppermint
Week 14: bella eats [and runs] – Ginger
Week 13: Coffee Talk – Walnuts
Week 12: For the Love of Oats – Pumpkin
Week 11: Trying to Heal – Sweet Potatoes
Week 10: The Inner Workings of a College Graduate – Eggplant
Week 9: Itzy’s Kitchen – Pears
Week 8: The Fitnessista – Cranberries
Week 7: Tri to Cook – Lentils
Week 6: Rhodey Girl Tests – Polenta
Week 5: Eating Bender – Butternut Squash
Week 4: Care to Eat – Apples
Week 3: On a Lobster Placemat – Mushrooms
Week 2: Hangry Pants – Tomatoes
Week 1: sportsnutritionliving – Quinoa
For this week’s Blogger Secret Ingredient Challenge (hosted by Kim of Ordinary Recipes Made Gourmet), the ingredient chosen was peanut butter. Ohhhhhh peanut butter, how do I love thee? Let me count the ways:
Peanut Butter cups
PB ice cream pie
PB cookies
PB cheesecake
Thai peanut sauce
PB sandwiches
PB smoothies
Shall I go on?
It was a tough decision, but looking around the house for accompanying ingredients, it was made much easier. I didn’t have much to work with and the deadline was coming up fast. I looked online for interesting ideas, but I didn’t really come across anything spectacular. I almost made Peanut Butter balls from a recipe out of an old Gourmet magazine, but they didn’t look that easy…too much chilling time. When I make dessert, it needs to be ready…and fast. Too much anticipation and I lose my love for it. I mean, I want to enjoy my dessert without too much sweat, blood and tears.
As I’ve mentioned before, experiments in baking or confectionery don’t always turn out so well for me, but these are fantastic. These are definitely going to be my new go to dish. My signature dessert, if you will. So give ’em a try, you will not be disappointed.
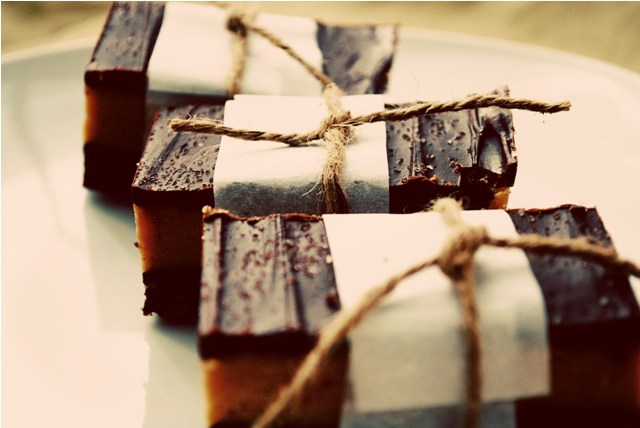
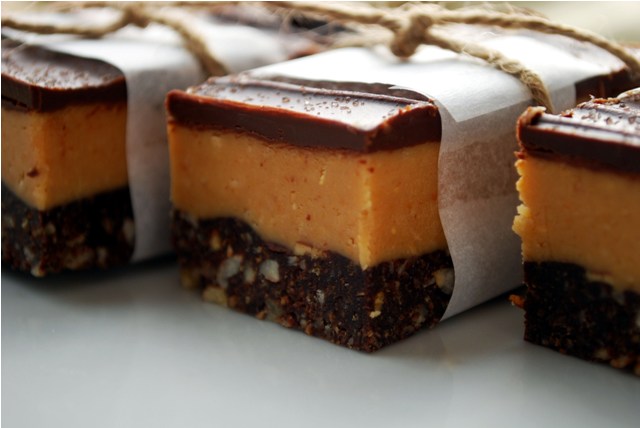
What’s with the name “Idle Hand Bars” you ask? Well, idle hands are the Devil’s playground and the Devil definitely made me make these, because they are sinful. Eat your boring, chocolate heart out, Devil’s Food Cake!
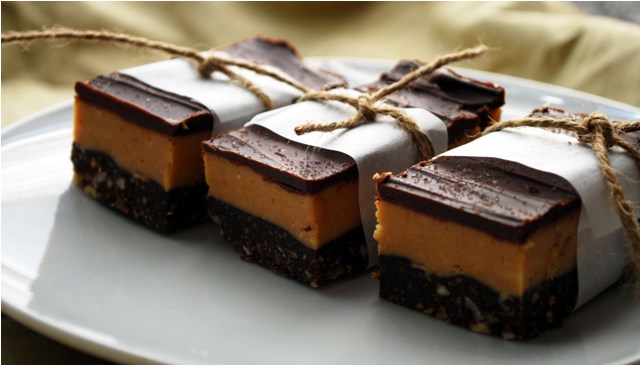
Idle Hand Bars
Base Layer
1/2 cup unsalted butter
1/4 cup sugar
5 Tbsp. Cocoa
1 egg, beaten
1 1/4 cups graham cracker crumbs
3/4 cup coarsely crushed pretzels
1. In double boiler (or a bowl resting over a pot of lightly simmering water), melt the first three ingredients.
2. While still over water, add egg and beat to combine (will thicken quite a bit here). Remove from heat and add crumbs and pretzels.
3. Press into an 8 x 8 cake pan. Set aside.
Middle Layer
1/2 cup unsalted butter, melted and cooled slightly.
2/3 cup powdered sugar
1 cup smooth, natural peanut butter (no salt added, reduce salt accordingly if using salted)
1/2 tsp salt
1 tsp vanilla
1. Add peanut butter and butter together in small bowl.
2. Mix in sugar, salt and vanilla to form a thick paste.
3. Dump onto base layer and smooth over, patting down to make a flat, even layer.
Top (final) Layer
5 oz. Semi Sweet Choclate chips (or other fine chocolate)
1 Tbsp unsalted butter
Pink Himalayan salt (or other fine sea salt)
1. In double boiler (or microwave), melt butter and chocolate chips together. Stir until complete dissolved and smooth.
2. Pour over peanut butter layer and spread out evenly.
3. Cool in fridge for about 5 minutes (should still be slightly soft on top but not warm).
4. Sprinkle, lightly, with Himalayan salt. Return to fridge (or freezer, if you’re in a hurry like I was), and let cool completely to become hard.
5. Cut into small squares and don’t say I didn’t warn you….these things are addictive.
I think these would be fantastic if they were left to mellow in the freezer for an hour or so. I love frozen desserts, and they last much longer when stored in the deep freeze. Happy snacking!
If you can’t find pink Himalayan salt, try using Fleur De Sel or another flaked salt. Table salt would do in a pinch, but it would probably make these too salty. Branch out, try new things! Go find some cool, new and interesting salts!
|

Hi! I'm Elizabeth. I like fitness, bad ass tattoos, food, bacon, chocolate, taking lots of silly pictures and my spawn. Check out my FAQ for all the usual Qs or send me an e-mail and tell me all about your cat and your Aunt Sally's amazing apple pie. |


