
My parents are retired. They are in their early fifties. They live in Mexico for 6 months. Are you jealous yet? I know I am. Every year when they pack up the RV (not that they have much to pack, as they live in it year round), and head back down the Baja, I have little pangs of jealousy. Seriously, who wouldn’t want to live in such a beautiful place. Here’s a couple of pictures you can gaze upon to join me in my envy.


Just so you know, I didn’t edit these photos at all.
Now, back to what I was talking about. Yes, yes, we’re all jealous of the beautiful weather, the ocean views, the fresh sea air, the freedom and the lack of responsibility. But the biggest thing I’m jealous of? The authentic Mexican food. No, seriously. I heart Mexican. Big time. I could eat it every day. There is such a wide variety of food available in Mexico, it’s no wonder it’s so popular the world over. It’s not just tacos, enchiladas, nachos, burritos and chimichangas either. Open up your culinary eyes and there is a vast variety of food coming out of Mexico.
The Baja is known for it’s huge variety of seafood as it’s basically one long coastline. Think lobster, marlin, dorado, squid, shrimp, crab, swordfish, tuna, etc. But also, there is much ranching there, leading to roadside stands serving goat, pork and beef. Baja California is home to the humble origins of the Caesar Salad and the Margarita. Quite a dynasty of food really.
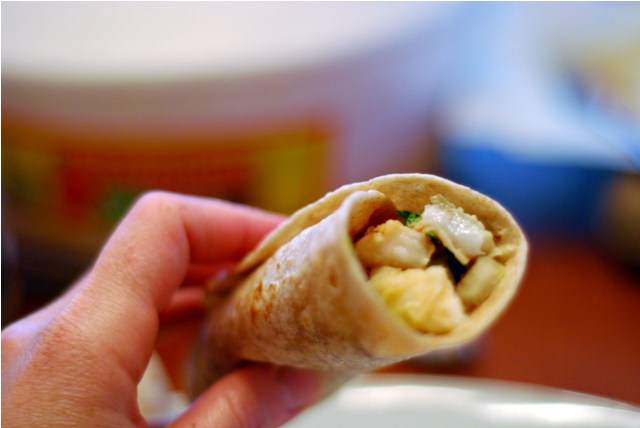
When my parents make their way back home along the coastlines of the the US, they bring with them my favorite souvenir, recipes. My Mother is a great cook, and has a way with traditional Mexican food. She has brought many a good dish home to me. Jicama and cucumbers, drenched in lime juice and salt as a very simple side dish, stuffed chiles rellenos, dripping in cheese, authentic Pico De Gallo, painstakingly diced to perfection. Another of my favourites is Conchinita pibil. Although it originated in the Yucatán, it is a wonderful, complex dish of pork marinated in citrus juices and achiote paste for hours until it literally falls to pieces. Delicious! But my all time favourite that I have learned from my Mother is this one, Baja fish tacos. Such a simple dish, full of fresh flavours and quite easy to put together.
I hope this recipe can become one of your family favourites too.
Baja Fish Tacos
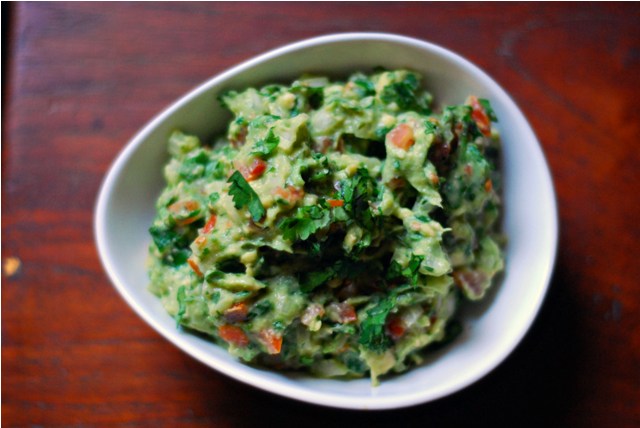
For the Guacamole:
1 large, ripe avocado (skin gives a little when pressed on, should be dark green to almost black)
1/2 large, ripe tomato
1/4 sweet onion
1/3 bunch cilantro
Juice of 3 key limes (or 1 small lime)
1. In a small bowl, with a fork, mash the avocado. Leave slightly lumpy, it does not need to be perfect.
2. Dice the tomato and the onion very fine (about 1/8″ x 1/8″). Add to avocado.
3. Finely mince the cilantro and add that to the avocado.
4. Pressing down on the limes, roll back and forth across the counter a few times. This releases the juices from inside. Cut and squeeze into avocado mixture. Make sure to remove seeds or squeeze lime into loosely held together fingers. The juice will go through, but the seeds will be caught in your hand. Or use a lime juicer!
5. Season with salt and pepper. Set aside.
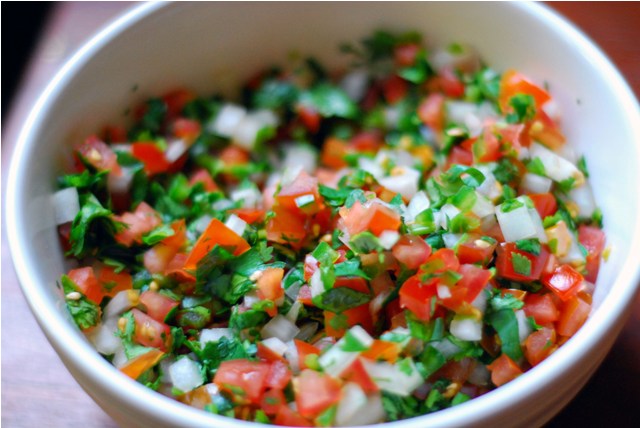
For the Pico De Gallo:
12oz tomatoes (roma or other highly flavourful varities)
1 small jalapeño
1/2 bunch cilantro
1/4 sweet onion
Juice of 3 key limes (or 1 small lime)
1. Dice the tomatoes and onion very fine. (Again, about 1/8″ by 1/8″). Toss into small bowl.
2. Deseed the jalapeño, and dice it the same as the onion and tomatoes. Add to bowl.
3. Finely mince the cilantro and toss with the rest of the ingredients.
4. Repeat the same technique as above and squeeze the lime juice into the other ingredients.
5. Stir to combine and set aside.
For the fish Tacos:
300g white fish (Dover sole, halibut, cod, etc.)
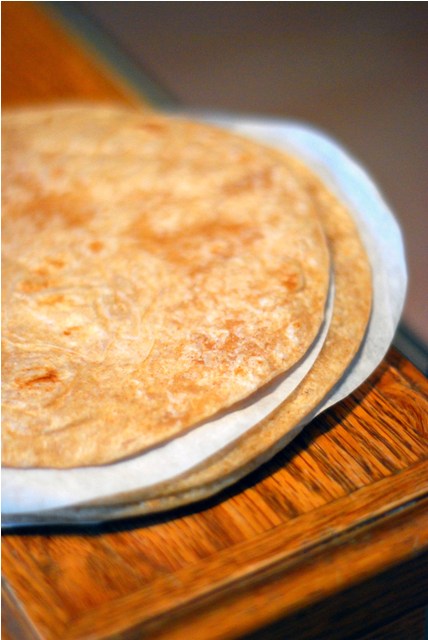
8-12 small tortillas
1/8 head iceburg lettuce, shredded
2/3-3/4 cup flour
1/2 tsp salt
1/8 tsp fresh cracked black pepper
oil & butter (about 1 Tbsp each)
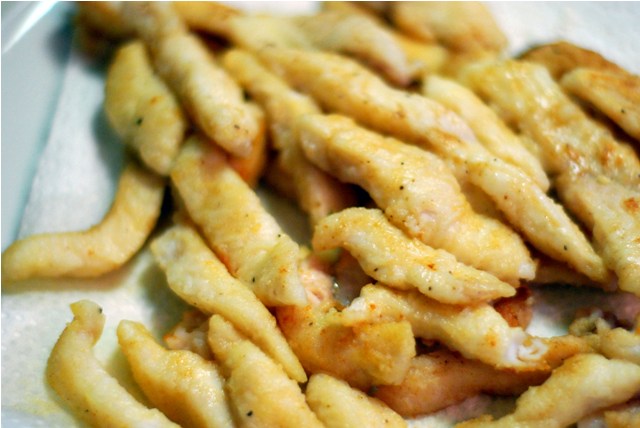
1. Slice the fish into thin, long strips, about 1/2″ wide by 3-4″ long)
2. Mix salt, pepper and flour on a large plate.
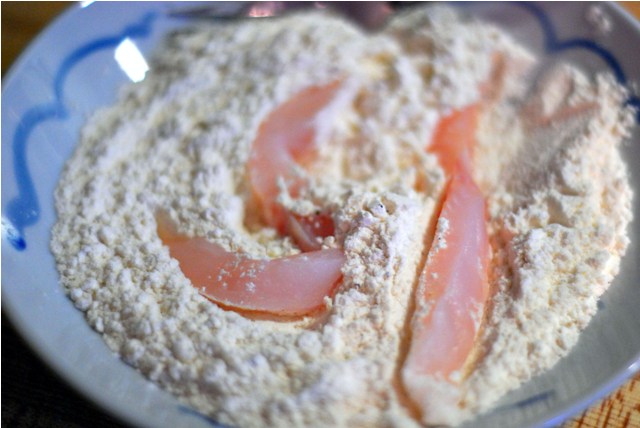
3. Heat butter and oil in a heavy bottomed frying pan on medium high heat.
4. Dip strips of fish into flour mix and then lay in pan. Allow to brown on each side before turning, about 1 minutes.
5. Remove fish to plate lined with paper towel (recycled of course!) and continue until all fish is battered and fried.
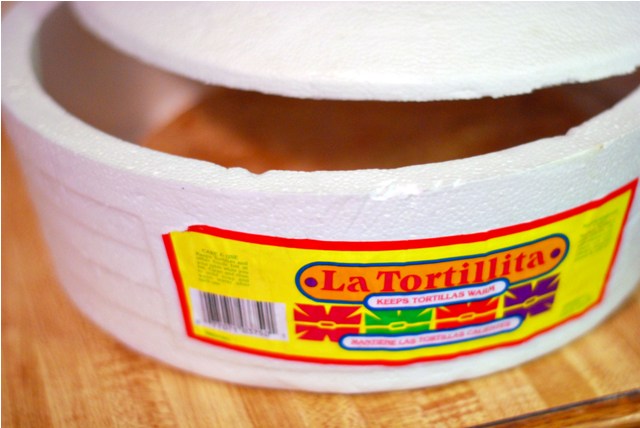
6. Heat tortillas in microwave or oven with paper towels between each one (sometimes they come with a liner between each one already). Keep warm in tortilla warmer, if you have one.
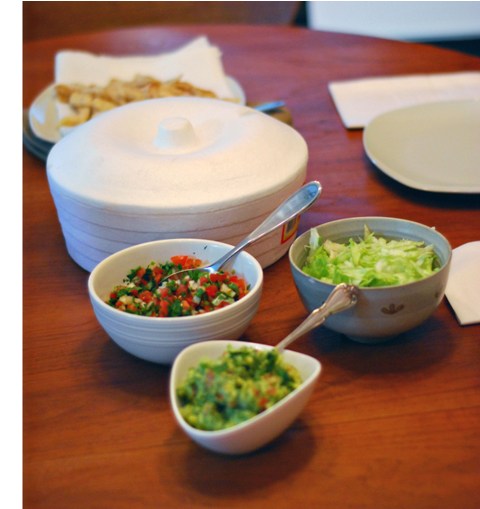
7. To serve, place everything on the dinner table individually and allow each person to personalize their taco.
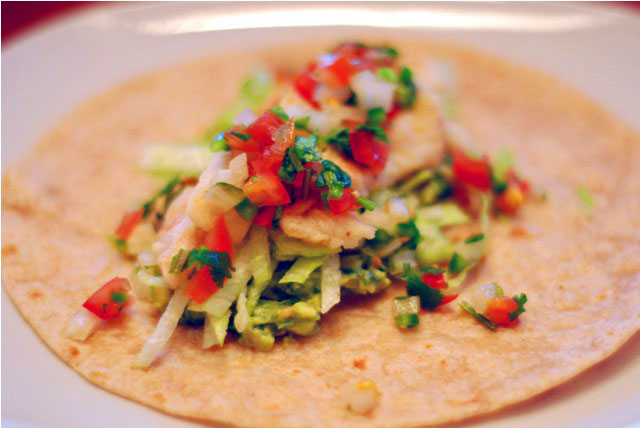
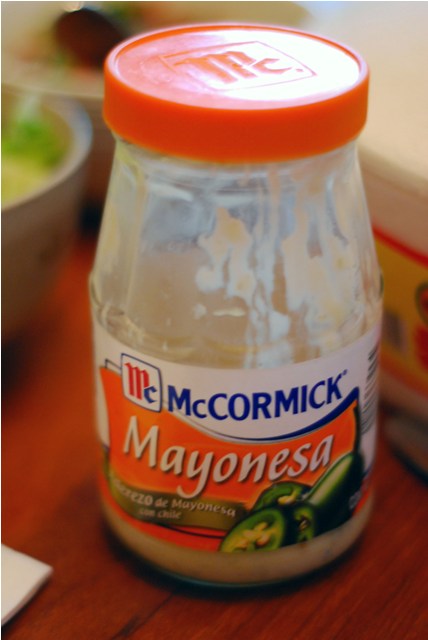
I like everything on mine, and my parents brought us this to use on ours as well: McCormick’s Jalapeño Mayonesa straight from the Baja.
I could eat these every day of my life. They are just so good. Light, yet filling and full of wonderful, fresh flavours.
Hey, maybe we can organize a foodie trip to Baja. Wouldn’t that just be the bee’s knees? Or the cat’s pajamas? You know what I mean…ooohhh the food we would eat! Goat roasted over a mesquite pit buried in the sand, fresh crab claws pulled off an unsuspecting victim who is then tossed back in, carnival food, icy margaritas. Okay, I’m starting to drool now. Think it over though, I’ll be waiting by the phone.

The October 2009 Daring Cooks’ challenge was brought to us by Jaden of the blog Steamy Kitchen. The recipes are from her new cookbook, The Steamy Kitchen Cookbook.
Welcome to my very first attempt at a Daring Cook’s Challenge! Although I joined a couple of months ago, we were so busy with child care and moving that I just didn’t book off enough time from everyday life to sit down, write out the recipe and get to experimenting with food I’ve never made before. Joining the Daring Kitchen is supposed to challenge my inner epicurean. So far, it’s made me cower in a corner making easy & simple (yet tasty) dishes that I am intimately familiar with instead of branching out and gettin’ dirty.
Well, let’s take this as my next step. The next step to pushing myself beyond my comfort zone, to not limiting myself because of my current knowledge. Life is about learning, a constant process that is ever evolving. We cannot remain static just as the seasons cannot do so. If my hunger cannot be sated it is most likely because it is somehow related to my hunger for knowledge. Let’s hope these challenges will fulfill that need and spark in me some creativity that I am always looking for.
Surprisingly enough, I’ve never actually eaten Pho in a restaurant or anywhere else for that matter. I have been to Vietnamese restaurants, but I don’t recall ever ordering this wonderful national dish. What a mistake that was. This has got to be one of the most complex and extraordinary tasting soups I’ve ever had. The roasted spices brought out such a deep, intense flavour in the dish. The addition, in the end, of the accompaniments, only added to my fascination. Such a light and fun meal, spicy for those who want and it utterly mild for those who don’t.
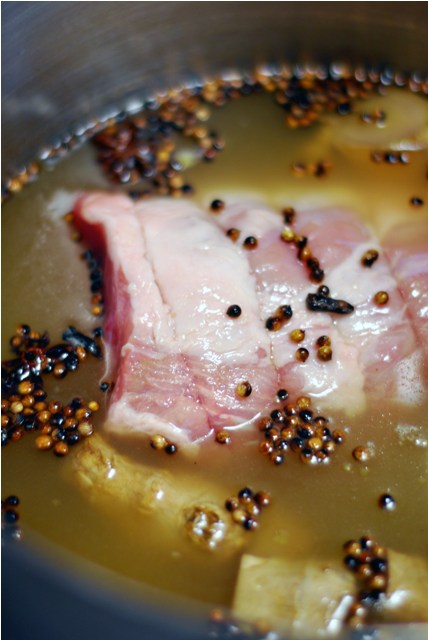
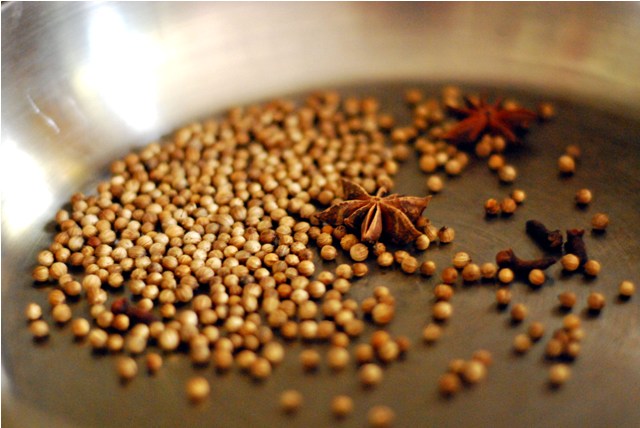
My only alteration to the recipe was to cook my broth for 2 hours instead of 20 minutes. I did use store bought stock, but because I bought such a large piece of pork for the dish, a longer cooking time was completley necessary. It only made the stock that much more concentrated with the heady aroma of the anise, cloves and coriander. I must say, I will definitely be making this again and again. Thanks Jaden, a wonderful dish!
Ingredients:
For the Pork Pho Broth:
2 tbsp. whole coriander seeds
4 whole cloves
2 whole star anise
2 quarts (2 liters/8 cups/64 fluid ounces) store-bought or homemade chicken stock
1 250-300g piece of pork (I used a huge 2 lb picnic roast. What? It was on sale!) (bone in or boneless)
½ onion
1 3-inch (7.5 cm) chunk of ginger, sliced and smashed with side of knife
1 to 2 tbsps. sugar
1 to 2 tbsps. fish sauce
1 lb. (500 grams/16 ounces) dried rice noodles (about ¼ inch/6 mm wide)
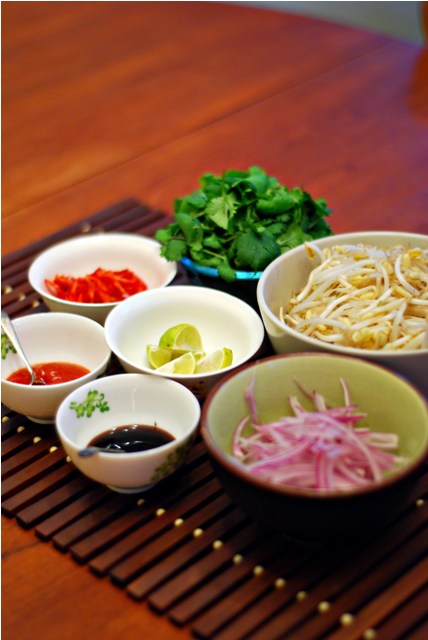
Accompaniments:
2 cups (200 grams/7 ounces) bean sprouts, washed and tails pinched off
Fresh cilantro (coriander) tops (leaves and tender stems)
½ cup (50 grams/approx. 2 ounces) shaved red onions
½ lime, cut into 4 wedges
Sriracha chili sauce
Hoisin sauce
Sliced fresh chili peppers of your choice
Directions:
- To make the Pho Broth: heat a frying pan over medium heat. Add the coriander seeds, cloves and star anise and toast until fragrant, about 3-4 minutes. Immediately spoon out the spices to avoid burning.
- In a large pot, add all the ingredients (including the toasted spices) and bring to a boil.
- Reduce the heat to medium-low and let simmer for 2 hours, skimming the surface frequently.
- Use tongs to remove the pork piece (or pieces) and shred the meat with your fingers, discarding the bone if you have used bone-in.
- Taste the broth and add more fish sauce or sugar, if needed. Strain the broth and discard the solids.
- Prepare the noodles as per directions on the package.
- Ladle the broth into bowls. Then divide the shredded pork and the soft noodles evenly into each bowl.
- Have the accompaniments spread out on the table. Each person can customize their own bowl with these ingredients.

When I started this blog, is was merely to be a way for me to motivate myself to get out of a food rut I’d been wallowing in for a year. The moment our son was born, my appreciation and knowledge of fine cuisine, went out the window alongside my pert, youthful breasts and late nights out with the girls. I knew you were wondering about that, well there you go.
Food after baby consisted mainly of steamed vegetables, salads with bottled dressings and fish baked with a little lemon pepper. Sad isn’t it? I knew I’d gotten into a place I didn’t want to be. A place where my only creative outlet was being stifled by my own laziness. Not to say that I wasn’t busy. Babies do take up a lot of time, but women have been making food from scratch and tending baby for centuries. I knew that a chef was still in there, somewhere, she just needed some inspiration.
That inspiration came in the form of a brand new Nikon D60. Now that I had this amazing camera, I felt I needed to do something with it to justify it’s purchase. Something other than taking pictures of my dog, the kid and the garden. I had a blog, but I’d never actually written anything for it. My husband prodded me to start writing about my one true passion. I needed no other motivation.
Only a few months in now, and the perks of having this creative space are many. Not only do family and friends know what I’m up to and get to immerse themselves in it, but people I don’t even know can too. Some might consider the voyeurism that goes along with blogging a bit weird, but I revel in it. I met a woman in a country market the other day, who asked me about some cilantro. I told her the many culinary uses for it and then proceeded on my way. My ever marketing husband swooped in behind me and mentioned my blog, to which the woman replied, “Oh, I’ve been to it!” Amazing. Strangers read my drivel. Not to lesson the impact of my words on your cerebrum, but it’s astonishing that someone other than my Mother/Sister/Father/Husband, would bother to read my thoughts.
And that brings me to the recipe I’ve featured today.
Recently, some friends of ours called us up to invite us over for dinner. Actually, our dentist and his lovely wife. Not only to eat, but to partake in the cooking and also some laughter and maybe just a little wine. To me cooking is fun, so being invited over to cook is akin to being the guest of honour. I have cooked at their house before, and it was such a good time, our hosts thought it would be a fantastic idea to continue it. We are hoping that we’ll get together twice a month, share recipes, ideas and just plain, good times. Nancy, our host, is my most avid blog reader. Inspired by my culinary adventures, she has taken on some of my best recipes. So kudos Nancy, you’ve definitely got the onions.
But you see, it was this blog that made this monthly cook off possible, and I couldn’t be happier. I have other things in the works as well, though I’m not at liberty to mention them just yet. Suffice it to say, I won’t be stopping any time soon.
For all my Canadian readers, Happy Thanksgiving! I hope this year has brought as much joy and happiness to you as it has to myself and my family. Cheers to everyone on this special holiday! Although, today’s recipe wouldn’t normally be considered a holiday meal, around these parts, seafood is welcome any time of year.
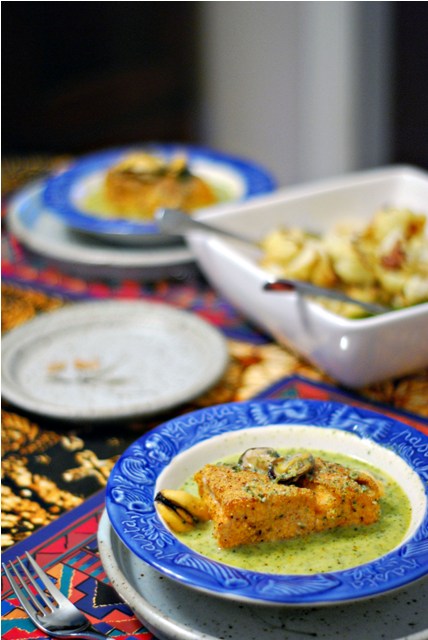
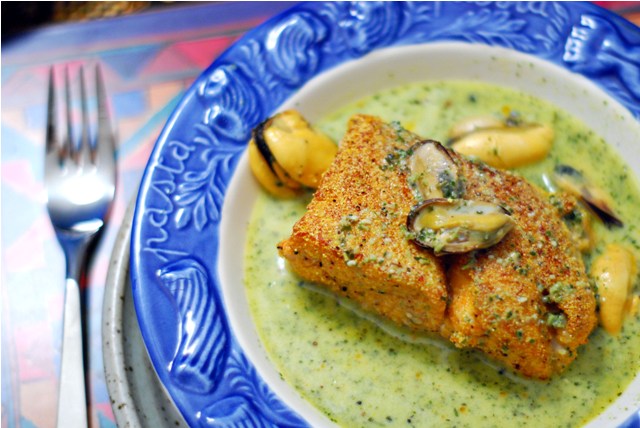
For our first meal, we decided to make Chef Michael Smith’s Cornmeal Crusted Salmon in a Basil Mussel Broth, served with my Miso Oysters, Ceaser Salad and bread for soaking up all that delicious nectar of the sea.
Cornmeal Crusted Salmon with Basil Mussel Broth
Adapted from Michael Smith
2lbs. of fresh mussels, debearded**
1 cup of Riesling or other dry white wine
1/2 cup heavy cream
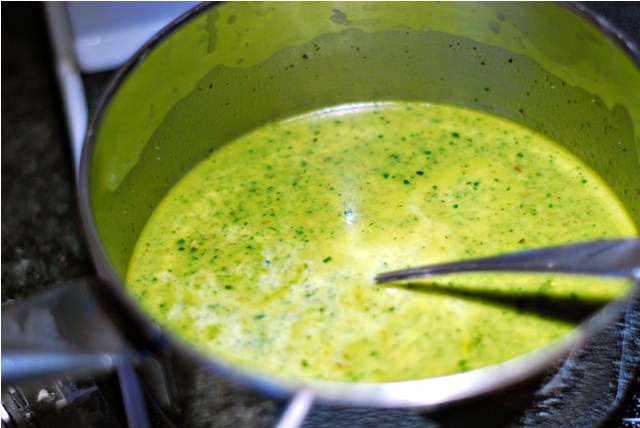
1/4 cup of pesto
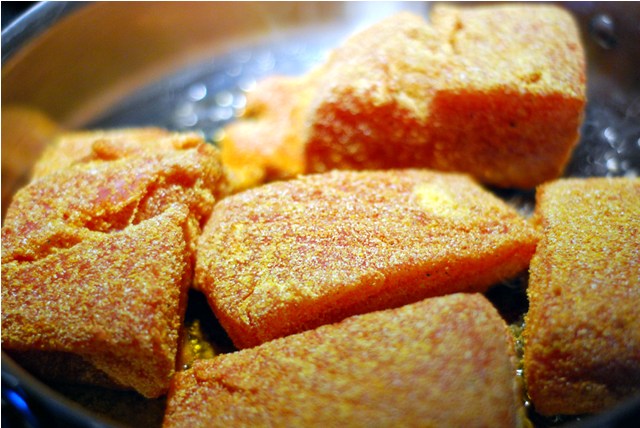
1 cup of fine cornmeal
1 Tbsp. Paprika
salt and fresh cracked pepper
4 6-oz salmon filets, skin on
3 Tbsp. Corn oil or other neutral flavoured oil
1. In a large, heavy bottomed saucepan, over medium high heat, add cream, wine and mussels.
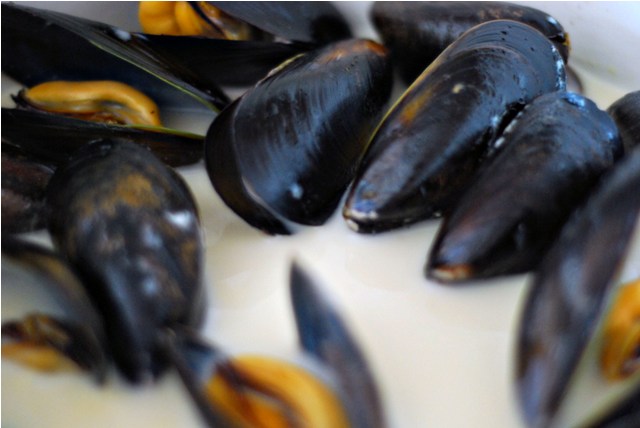
2. Cover with lid to keep steam in, and cook 5-7 minutes, or until mussels are all fully opened.
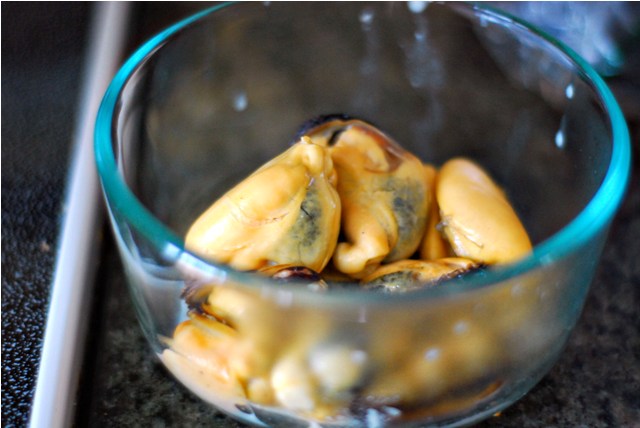
3. Remove from heat and set aside to cool. Once cool, remove mussel meat from shells, toss shells and set meat in small bowl. Pour cream sauce into smaller saucepan, add pesto and set that aside as well.
4. Place cornmeal, salt, pepper and Paprika in a large plastic bag. Shake each salmon filet separately in bag to coat. In large sauté pan, heat corn oil on medium high. Add salmon, skin side down first to hot pan. Sear for 5-6 minutes per side, or until cornmeal crust is browned and crisp and salmon is done to medium.
5. Heat cream/pesto sauce until warmed through, add mussel meat back to sauce and continue to warm.
6. In bowls, add one salmon filet and top with mussels and some of the sauce.
7. Serve with plenty of crusty bread for dipping.
** Mussel shells should be tightly closed. If not, give it a tap, if it does not close, mussel is dead and should be discarded.
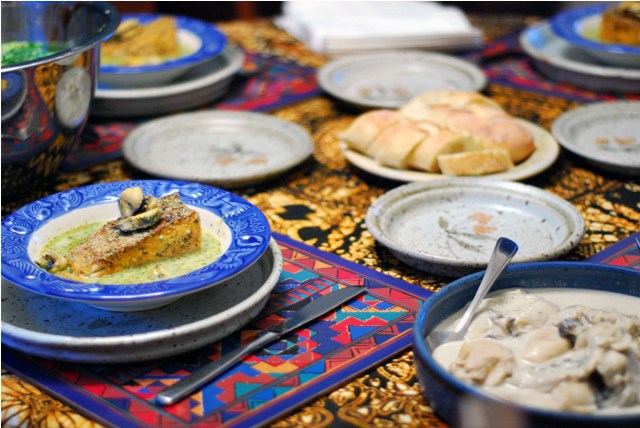
I have to say thank you to Nancy and Jay for your hospitality, good company, fine beverages and great food. Cheers, we’ll be seeing you again soon!
I feel like I haven’t addressed something very important that’s happened this week. Do you know what I’m talking about? The fall of Condé Nast’s Gourmet Magazine has been the talk of the social networking world since it’s abrupt announcement on Monday morning. As a self professed food whore, I am saddened by this great magazine’s sudden decline. Gourmet magazine has been around since 1941, and has held the attention of food enthusiasts ever since. More recently, Gourmet has been dubbed too “upper class” and gearing itself towards a more bourgeois audience. There was a recent article on how food critics could spend $1000 in their own home town. There has been a lot of talk this week on who’s fault it really is. Is it us food bloggers? Are we bringing the recipes you could find in Gourmet straight to people’s inbox for free instead of the inflated $5.00 newsstand price? Is it the Rachel Rays and Sandra Lees of the world? The 30 minute meals and Semi-Homemade recipes that everyone “really wants” that has driven such an iconic magazine into the ground? We’ll never really know. What we do know is that Bon Appetit, Gourmet’s sister Magazine and well matched competition, is still around, as are many well rounded food publications such as Saveur and Home & Garden. Is it sad? Indeed, it is sad to lose a magazine of such outstanding pedigree, as well as the many talented writers and photographers who are now jobless, and perhaps will become my competition. Don’t lose hope though, there are food blogs out there that provide equally gourmet recipes and outstanding photography. We may have lost some inspiration, but maybe now we can make our own.
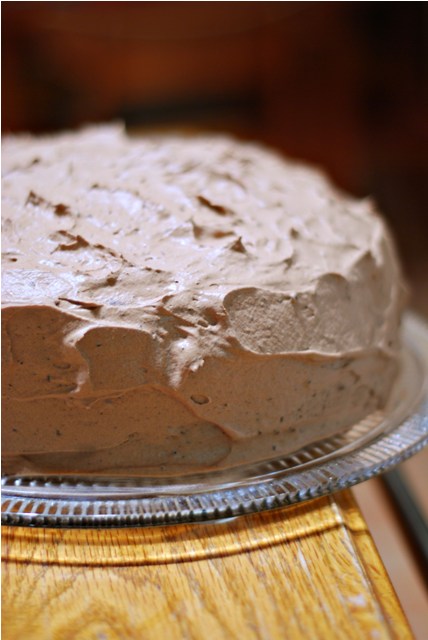
What does all that have to do with today’s recipe? Absolutely nothing! In fact, today’s recipe is from a few weeks ago. I made this cake as requested by my dear husband for his birthday. A favourite amongst his family, is mocha. I love mocha too, so bring on the dark chocolate and coffee! Actually, this cake was made in record time and in doing so I made a few mistakes. Mistakes that eventually turned out to have bettered the cake enormously. You couldn’t even tell I had made it in less than 3 hours, cooling time included. Freezers are wonderful for speedy cooling.

Dark Chocolate Mocha Cake
For the cake:
2 cups dark brown sugar, packed
1 3/4 cups pastry flour
3/4 cup good quality Dutch Process Cocoa
1 1/2 tsp Baking powder
1 1/2 tsp Baking soda
1 tsp salt
2 eggs
1 cup buttermilk
1/2 cup melted unsalted butter
2 tsp vanilla
1 cup hot strong coffee (or 1 Tbsp instant coffee with 1 cup hot water)
1. Preheat oven to 350°F. Arrange racks in middle of oven. Grease 2 9″ round pans and line bottoms with parchment paper (Makes removal of this ultra-moist cake easier).
2. Stir dry ingredients together.
3. Add eggs, buttermilk, melted butter and vanilla to dry mix. Mix for 2 minutes with a whisk.
4. Pour in hot coffee and mix thoroughly.
5. Pour into pans and bake for 35-40 minutes.
6. Remove from oven and cool in pans for 20 minutes or more before turning onto wire rack to completely cool.
For the Ganache:
1/2 cup dark chocolate (70% solids)
1/2 cup butter
1. Melt chocolate and butter in microwave at 30 second intervals. Stir between, and do not overheat!
2. Arrange first layer of (cooled) cake on cake plate. Pour half of chocolate over first layer. Place second layer of cake on top of first. Pour remaining chocolate over second layer.
3. Set cake in fridge or freezer to harden.

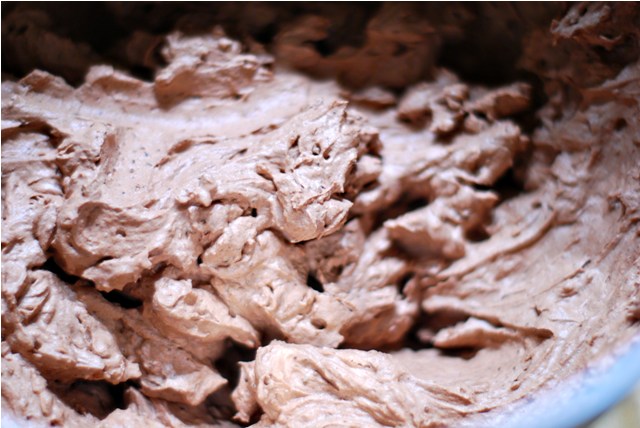
Mocha Frosting
500 mL Heavy Cream
1/4 cup sugar
1 tsp vanilla
1/2 cup cocoa
1 Tbsp very finely ground coffee beans (or instant coffee granules)
1. In bowl of electric stand mixer, pour cream, sugar and vanilla.
2. Beat on medium high until soft peaks begin to form.
3. Add cocoa and coffee and whip until stiff.
4. Frost cooled cake completely on all sides. You may want to begin with a crumb coat, but it doesn’t matter too much as the frosting is already speckled with coffee.
Just a note: This cake does need to be refrigerated when you are not devouring it.

Yup, it’s THAT good.
Before I was a lonely home cook, slaving away in the kitchen all evening only to have dinner be rejected by my own spawn for the much preferred scrambled eggs a la Papa, I used to work in some pretty fabulous restaurants. These fabulous restaurants taught me many things, but the thing I value the most, that singular piece of information worth it’s weight in gold, is flavour combination. When combining flavours, one must have a keen palate and an eye for detail. Things can go very wrong when you don’t know what flavours go together and what would be a terrible mistake. Some things are simple, vanilla goes with strawberries, cinnamon does well with molasses. But what about fennel? Does it go with pork? Does caramel go with marsala? These questions can be confusing and not easily answered. Until now! I recently discovered this great website: FoodPairing. For instance, did you know that roasted lamb pairs well with rum? Good to know! Also, if you are truly curious, there is The Flavour Bible, a collaboration with many of America’s top chefs. This book is the definitive guide to flavour pairings.
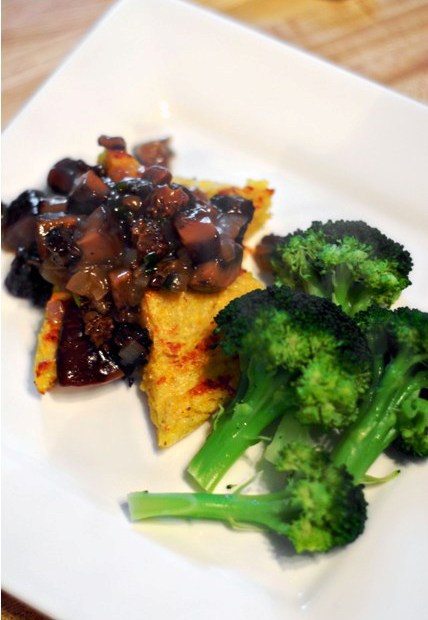
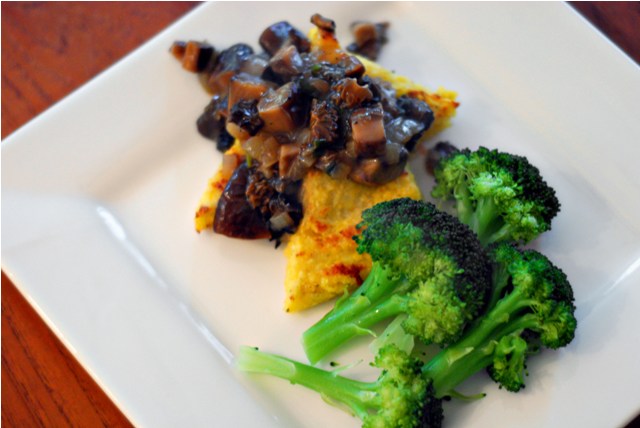
Today’s recipe is a bit of an easy combination of flavours. Mushrooms in a thick brown sauce, poured over a lovely rosemary spiked, baked polenta. There’s not much guess work here, mushrooms go with many savoury dishes. It has been waiting to make it’s debut for some time now though. I kept it in the vault for a little while, waiting for more cooler weather to rear it’s ugly backside. As I’ve said a gazillion times, I like to buy local and stay seasonal, so this dish fits right in there. (Did you like my use of the word gazillion? I put that in there to bug my husband. He says it’s not a “real” word, but what is nowadays?)
This dish can be made any time of year really, because I use dried mushrooms. Mainly because they are much cheaper, store for longer periods and when you soak them, you create a delicious mushroom stock. You can use whatever mushrooms are available, and even fresh would work just fine.
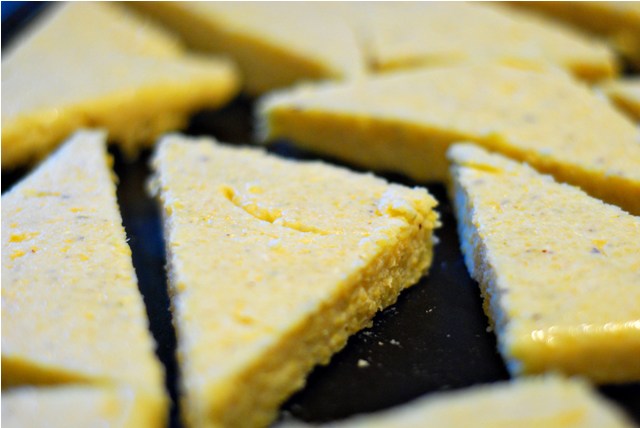
Baked Polenta with Morel and Shiitake Mushroom Sauce
For the polenta:
2 cups whole milk
3 cups water
1 1/2 cups corn meal, medium grain
1 tsp salt
1/2 cup parmesan, grated
1 tsp rosemary, dried and pulverized
1. Heat the milk and water to a rapid boil.
2. Slowly sprinkle in the corn meal, whisking as you go.
3. Add salt and turn down to a simmer. Continue to whisk as it cooks, which could take anywhere from 5 minutes to 45 minutes depending on your corn meal.
4. Stir in Parmesan near the end, and remove from heat.
5. On a greased baking tray (1/2″ high sides), pour the polenta and pat the top into an even, flat surface. Make sure the polenta is no thicker than 1/2″.
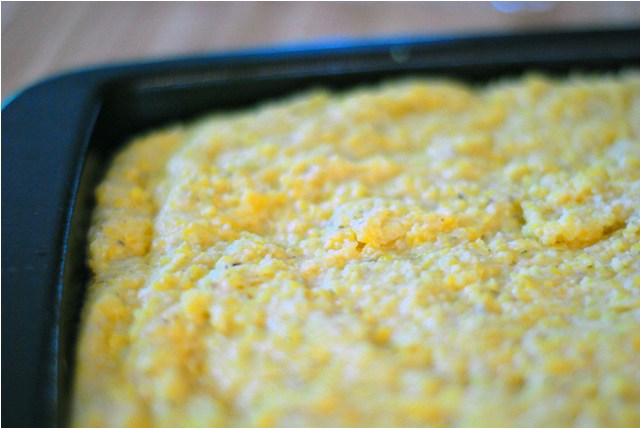
6. Cool in refrigerator for about 30 minutes.
7. Remove from fridge, cut into desired shapes and bake in a 450°F oven for 20-25 minutes. Make sure to flip the polenta once halfway through.
For the Mushroom Sauce:
22g Dried Morels
2 oz dried shiitake mushrooms
4 cups boiled water
1/2 a sweet onion, diced
1 clove garlic, grated
2 green onion stalks, chopped
2 Tbsp salted butter
1/2 lb. fresh brown crimini mushrooms, sliced
1/2 cup vermouth
salt & pepper
1 Tbsp cornstarch
3 Tbsp cold water
white truffle oil (optional)
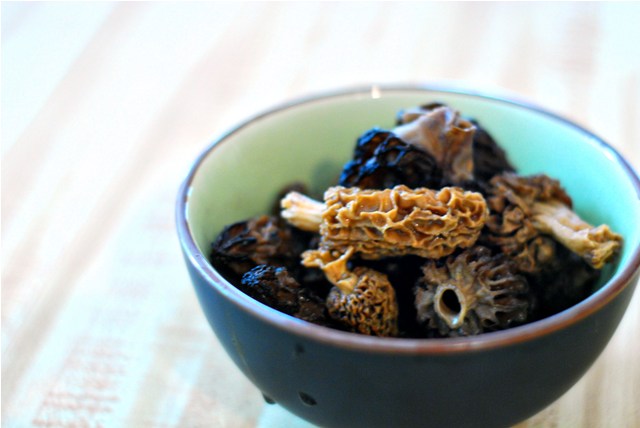
1. In just boiled water, soak mushrooms for 45-60 minutes.
2. When done soaking, remove stems of shiitake and dice all mushrooms. Reserve water for sauce.
3. In a deep, heavy saucepan, heat butter on medium high heat. Add in garlic, onions and mushrooms (all three kinds).
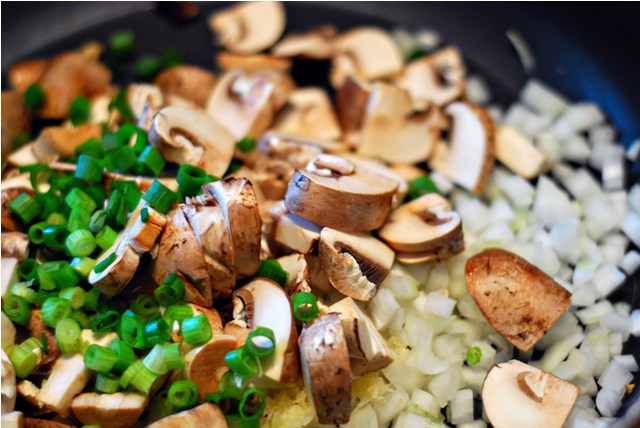
4. Sauté for about 15 minutes. When all liquid has evaporated, add in vermouth and deglaze pan.
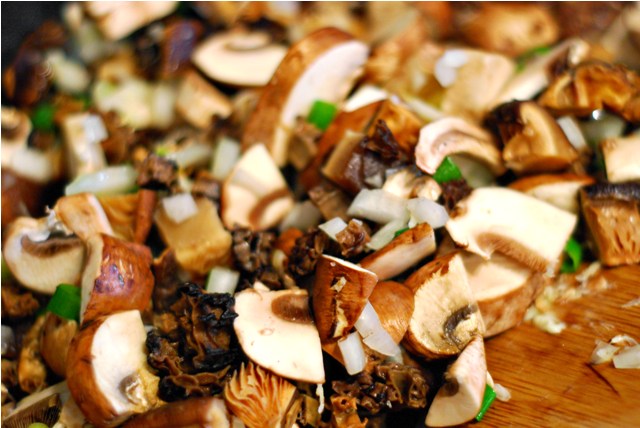
5. Add reserved mushroom water one cup at a time until a sauce begins to develop. You will most likely use 3 cups of stock.
6. Mix cornstarch and water until fully combined. Add one teaspoon at a time to mushroom sauce until desired thickness is achieved.
7. Season with salt and pepper and serve on top of polenta.
8. If using truffle oil, sprinkle over sauce just before eating. Serve with steamed vegetables.
|

Hi! I'm Elizabeth. I like fitness, bad ass tattoos, food, bacon, chocolate, taking lots of silly pictures and my spawn. Check out my FAQ for all the usual Qs or send me an e-mail and tell me all about your cat and your Aunt Sally's amazing apple pie. |


