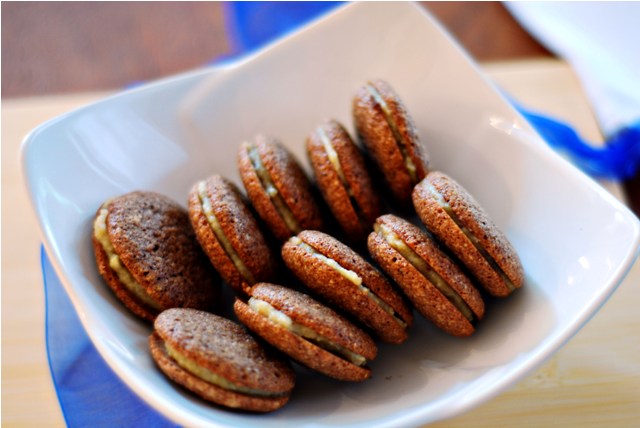
The 2009 October Daring Bakers’ challenge was brought to us by Ami S. She chose macarons from Claudia Fleming’s The Last Course: The Desserts of Gramercy Tavern as the challenge recipe.
Uh oh.
Seriously? Ughhhhhhhhhhhhhhhhhhhhhhhhhhh……………………..
Yup, that was my exact reaction when I saw this month’s challenge was going to be French Macarons. Now, I love the look of these quaint little cookies, I love the fact that they are gluten free without the need to alter the recipe, and I love the flavour combination possibilities. You can literally do anything with these. Salty, sweet, savoury, dessert, appetizer, it doesn’t matter. They are little shape shifters, ready and willing to take on anything you have to throw at them.
So why the harsh reaction in learning that they were this month’s challenge? Because they are such a challenge! Google “macarons” and you will invariably come across many a message board with frantic questions from the beginner baker asking why their macaron is lacking in the telltale feet. The feet being the cute little ruffle that is on the bottom of each cookie, or should I say is supposed to be there.
I’ve never made a macaron, and I don’t recall having ever eaten one either. I’ve seen them countless times, but I usually opt for more decadent treats. Give me cream filled cannolis or frosting coated cakes over itty bitty cookies. Also, there is the lack of people making them anywhere near me in my tiny village. If I come across one any time soon, I’ll be picking some up for sure.
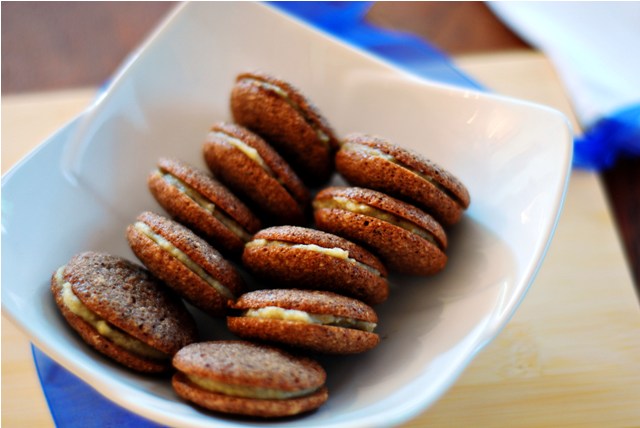
Now let’s get to what happened to mine. I followed the recipe as best as I could, but sadly mine came out feetless every single time. Don’t get me wrong, they were utterly delicious, but they were more of a regular old cookie sandwich rather than a delightfully, quaint French treat.
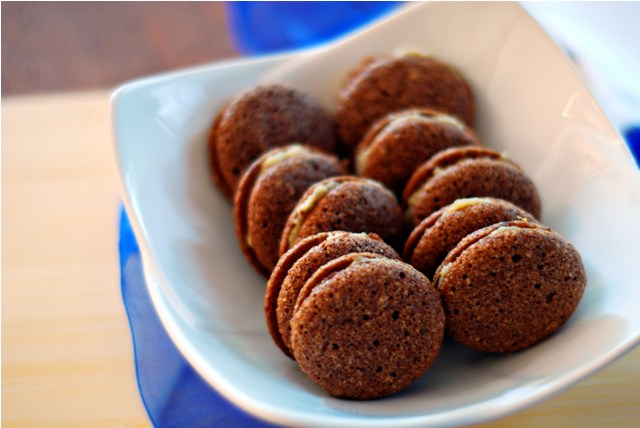
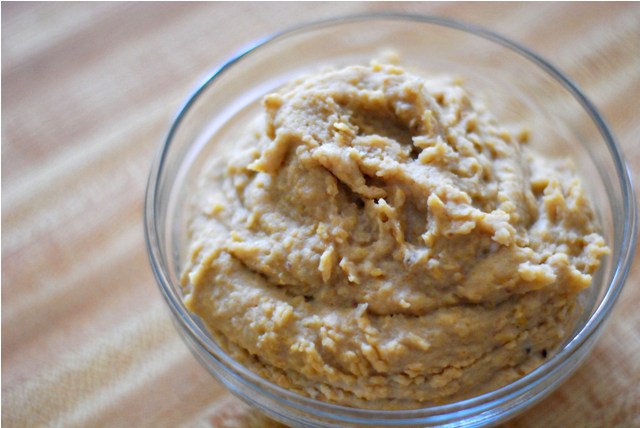
My one success out of all this learning was the filling. There’s just something about sweet, creamy chestnut cream inside those lovely chocolate cookies.
So, although mine did not turn out, I think everyone should try their hand at these little bauties at least once (or twice) in their lives. I don’t often fail at my attempts at baking, but this time was different. I am humbled.
Chocolate Macarons with Sweet and Salty Chestnut Filling
Macarons:
Icing sugar: 2 ¼ cups (225 g, 8 oz.)
Almond flour: 2 cups (190 g, 6.7 oz.)
Granulated sugar: 2 tablespoons (25 g , .88 oz.)
Egg whites: 5 (Have at room temperature)
2 Tbsp good quality cocoa
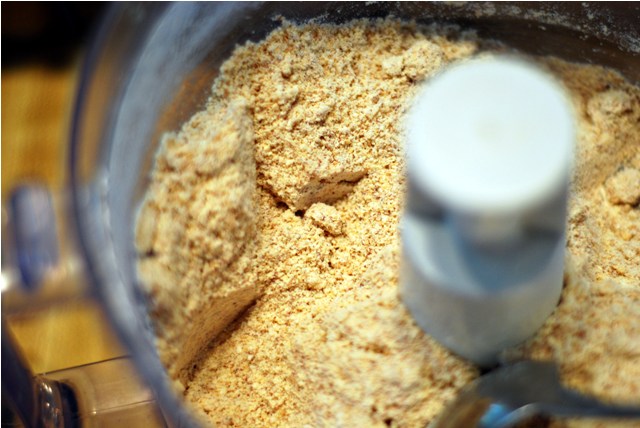
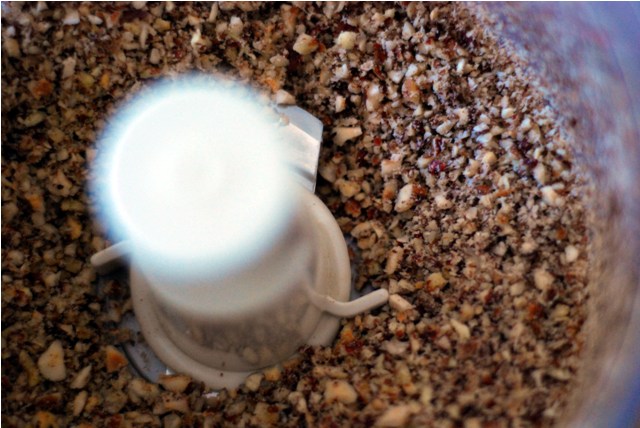
1. Preheat the oven to 200°F (93°C). Combine the confectioners’ sugar and almond flour in a medium bowl. If grinding your own nuts, combine nuts and a cup of confectioners’ sugar in the bowl of a food processor and grind until nuts are very fine and powdery.

Not quite…
That’s lookin’ good.
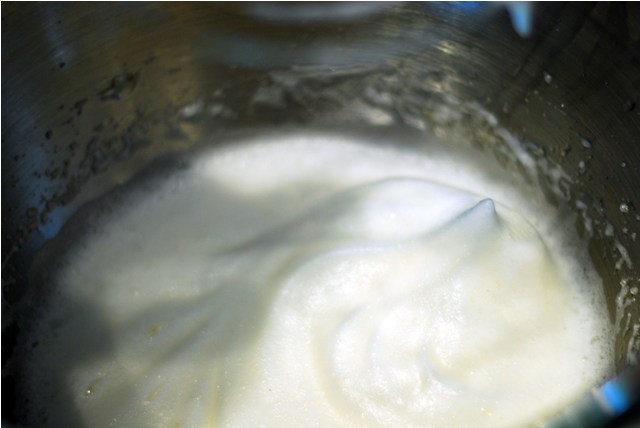
2. Beat the egg whites in the clean dry bowl of a stand mixer until they hold soft peaks. Slowly add the granulated sugar and beat until the mixture holds stiff peaks.
3. Sift a third of the almond flour mixture into the meringue and fold gently to combine. Add the cocoa in at this point as well. Sift in the remaining almond flour in two batches. Be gentle! Don’t overfold, but fully incorporate your ingredients.
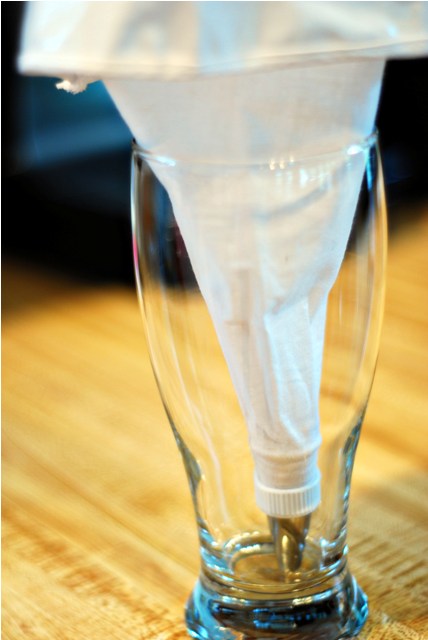
4. Spoon the mixture into a pastry bag fitted with a plain half-inch tip (Ateco #806). You can also use a Ziploc bag with a corner cut off. It’s easiest to fill your bag if you stand it up in a tall glass and fold the top down before spooning in the batter.
5. Pipe one-inch-sized (2.5 cm) mounds of batter onto baking sheets lined with nonstick liners (or parchment paper).
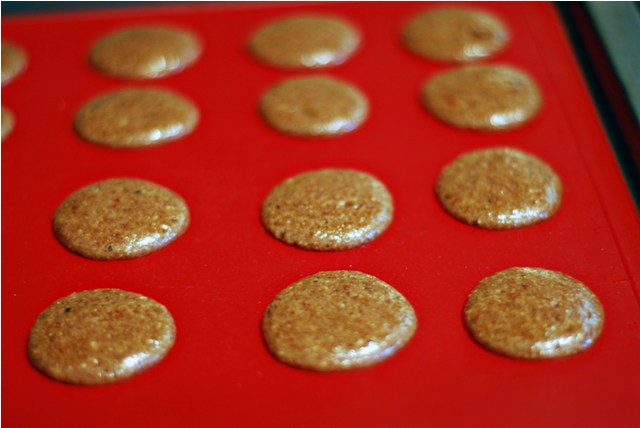
6. Bake the macaroon for 5 minutes. Remove the pan from the oven and raise the temperature to 375°F (190°C). Once the oven is up to temperature, put the pans back in the oven and bake for an additional 7 to 8 minutes, or lightly colored.
7. Cool on a rack before filling.
For the Filling:
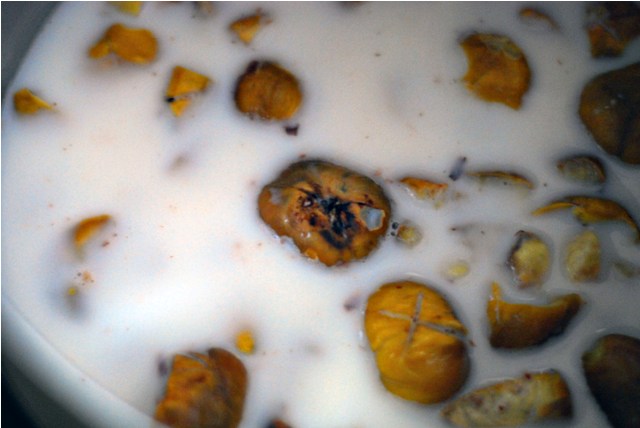
1 lb. chestnuts, roasted
1 cup whole milk
1 cup water
25 g icing sugar
30 g unsalted butter at room temperature
1/2 vanilla bean
2 grams salt
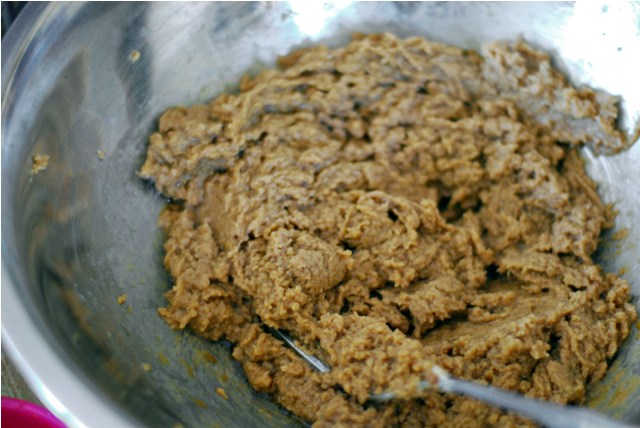
1. Peel roasted chestnuts and add to small saucepan. Fill with water and milk. Bring to boil and simmer on medium heat for 20-25 minutes (or until chesnuts are well softened and liquid is reduced).
2. In the bowl of a food processor, add the chestnuts and the reserved liquid.Pulse until mostly pureed.
3. Add in the sugar, butter the seeds from the vanilla pod and the salt.
4. Pulse until completely pureed and combined.
5. To fill cookies, spread filling on one cookie (not so much that it oozes out the sides, but not so little that you can’t see it when sandwiched). Top with another cookie.
6. Can be refrigerated for a couple of days.
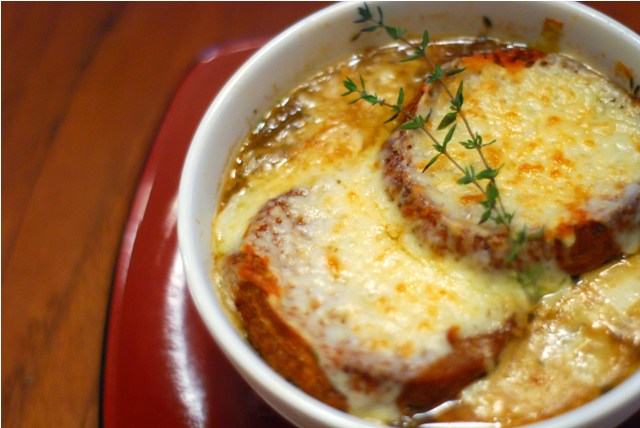
While we’re on this soup/stew kick, I’d thought I’d give you a recipe for my take on a classic French dish. Now, though I took French Immersion from kindergarten to high school, my grasp of the French language is somewhat limited. I’m sure I understand more than the average Joe, but left to wander the streets of Paris, I may have a hard time finding my way to the best place for a nice, steamy bowl of French Onion Soup. Would it still be called French Onion Soup, or just Onion Soup? Soupe D’oignan? Potage D’oignan?
In any case, this is a pretty standard, classic dish. Not much to change, only to tweak. Seasonings are up to you, so make them personal. Vegetarian? Use vegetable broth instead of beef, or if you are just looking for lighter fare, use chicken stock. My version is very heavy on the onions, so reduce those if you are having this as a side dish. I like mine as a main meal.
On another note, as you are reading this, I am kicking up my feet and relaxing in wine country for a few days. My Brother-in-Law is having a milestone birthday, I’ll spare him the indignity of having me say which one, but needless to say there’s gonna be a party. We’re driving a fair distance to attend and as the family food blogger, I must bring goodies. I’ll be frying up some doughnuts that I’m testing for a fellow blogger (who? Can’t say yet.) and slingin’ back a few glasses of local whites. I can’t say I’ve ever made doughnuts before, so wish me luck. Working with a potentially disfiguring vat of boiling hot oil scares me just a little bit. It’s all in the sake of padding these thighs though, a very worthy cause if you ask me.
Until next time!
Liz
French Onion Soup
2 Tbsp butter
6 medium to large yellow onions, sliced in half and then into half rounds
3/4 cup vermouth (like Noilly Prat)
2 cloves garlic, grated or minced
8 cups beef broth
1 bay leaf
3 large sprigs fresh thyme
s & P
Round slices of crusty bread (optionally buttered on both sides)
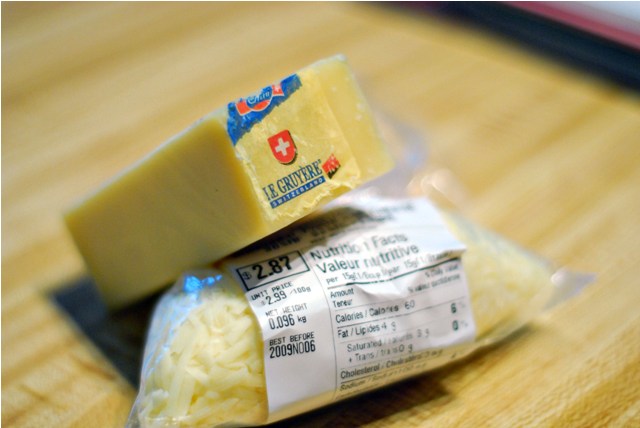
1 cups grated Swiss Gruyère
1/2 cup grated Parmesan
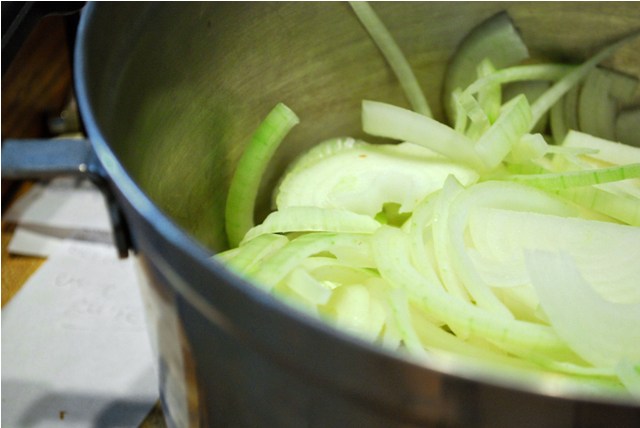
1. In a large, deep saucepan, heat the butter on medium high. Add in onions and sauté for 30 minutes. The onions should begin to caramelize and turn brown. Remember to stir often so nothing sticks to the bottom, but scraping some of the brown bits into the onions is a good thing.
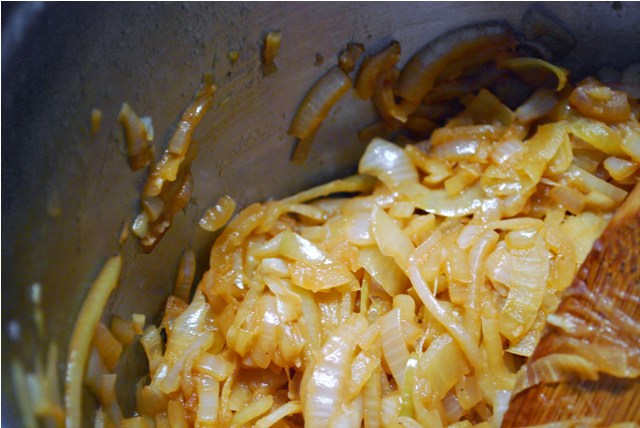
2. Add garlic and sauté 3 minutes. Deglaze saucepan with vermouth, and simmer for an additional 5 minutes.
3. Add stock, herbs and salt & pepper.
4. Bring to a boil, tunr down and simmer for anywhere from 1 hour to 1 hour and 45 minutes. The longer the flavours have to meld, the better.
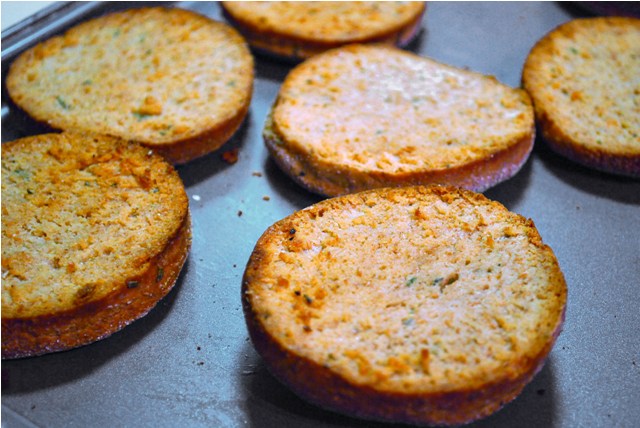
5. In oven proof bowls, ladle the soup. Top with some crusty bread, sprinkle on the cheese and pop under the broiler until the cheese is bubbly and brown. Bon Appetit!
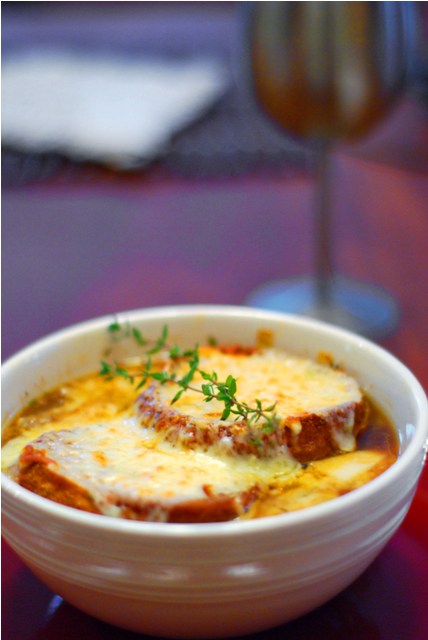
Try this as a showy appetizer (in small bowls) at your next get together, or savour it alongside a light spinach salad as a full meal. Whatever you choose, just be sure to use good quality cheese, it makes all the difference.
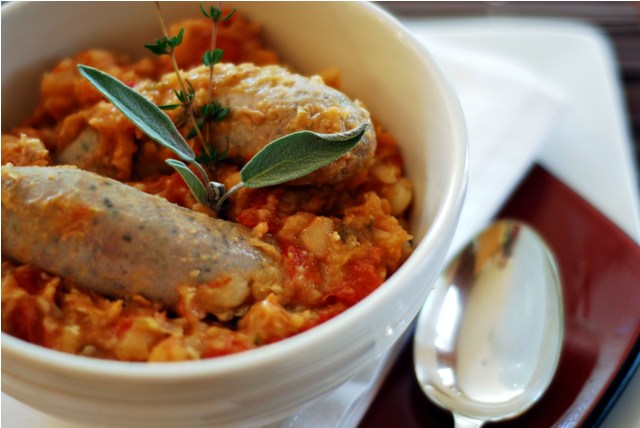
If there is one thing about the cooler weather that I, inexplicably, love, it is the fact that it’s damp, cold chutzpah sends me fleeing into the house. Or should I say, truthfully, that I cower in a ball on the couch, wrapped in layers of warm fabric (perhaps a comfy Snuggie?), fire blazing, purposefully avoiding the doorways at all costs. I only venture out to get mail, groceries, eggs and the occasional piece of fuel for said fire. Not that I’m a hermit by any means. I do have my intrepid social activities involving friends and family. Nothing else could draw me from this dwelling in this kind of weather.
Another way to conveniently (and cheaply) heat the house, is to have pots of steaming food simmering away for hours on the stove. There are, most likely, a million and one dishes to be prepared in such a way. Well, I’ll probably get to them all this winter. Being my first year relying almost solely on fire for heat, we shall see how I do. I’m not one for being too hot, or too cold. A fire is a very unpredictable heat source, I’ll tell ya. One minute I’m freezing my buns off, the next I’m peeling layers off like it’s a sudden heat wave in October. The inconsistency of it drives me mad! I’ll learn to deal, and in the meantime, I will continue to heat the house using nothing but beans and steam.
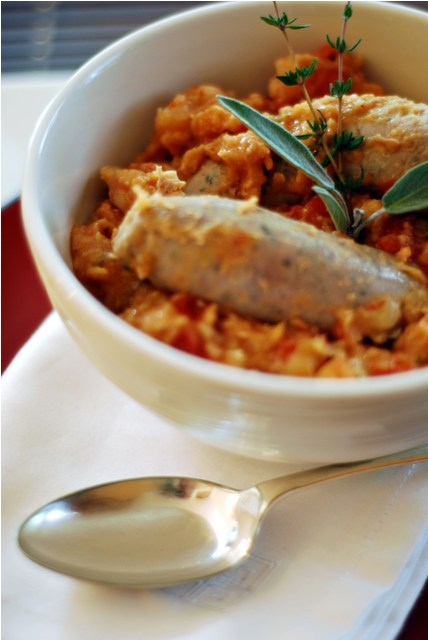
Italian Sausage & White Bean Stew
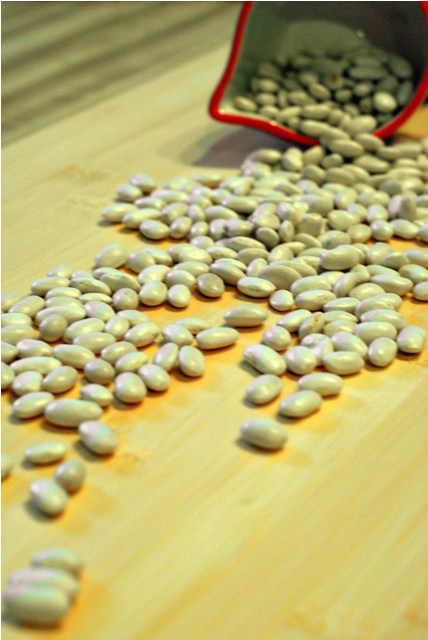
1 lb. Cannelini beans, dried (Soaked in at least 8 cups of water overnight)
8 cups water
2 tbsp olive oil
8 cloves of garlic, peeled
1/2 cup fresh sage, roughly chopped
1/4 tsp, fresh ground black pepper
1 tsp salt
1. Drain soaked beans and add to large saucepan. Add 8 cups water, oil, garlic, sage and pepper. Bring to boil, boil for a few minutes and then reduce to medium low. Simmer for 1 1/2 hours (make sure the pot remains bubbling).
2. The garlic will become almost mush, and will dissolve into the beans.
About 30 minutes prior to the beans being done, get the rest of the dish ready:
1 Tbsp veg oil
2 cloves garlic, minced or grated
4 large, mild Italian sausages (I used sausages with fennel)
1 28oz can plum tomatoes, drained and chopped (juice reserved)
1/2 cup fresh herbs (oregano, thyme, sage, rosemary, etc.) minced very fine
1 1/2 tsp crushed toasted fennel seeds
1. In large, deep sauté pan (with lid), heat oil. Sauté garlic for 2 mins on medium heat or until slightly browned.
2. Add whole sausage, raise heat to medium high and brown for 5 minutes.
3. When sausages have achieved a nice browning, turn heat down to medium again, add tomatoes, their juices and the herbs. Allow to come up to a simmer and simmer for 5 minutes.
4. Add beans to sauté pan (most of the liquid should be gone by now, but if there is too much just scoop some out before adding).
5. Cover and simmer on medium low for 30 minutes.
6. Uncover, season with salt and pepper and serve.
I love a challenge. Especially if it involves baking something delicious and then eating it. When I (and a lot of others I presume) think of fall seasonal flavours, probably one of the most popular choices would be pumpkin. So many possibilities with this humble gourd. It can be sweet, it can be savoury, you can eat the seeds, or you can carve it up and cram a candle inside it. Such fun to work with, and easier than 1,2,3 if you use the canned stuff.
My family never made pumpkin pie at Thanksgiving, or pecan pie for that matter. I was totally deprived of this spicy fall treat until well into adulthood. Once I did try it though, I was hooked. There’s just something about pumpkin, once it’s been mixed with other enhancing flavours, that conjures up all the best memories of autumn. Crisp, colourful leaves, the whiff of wood smoke on the cool breeze, the return of my favourite long coats.
And so it was that I came to the dilemma of the pumpkin cookie. Sure, I’ve seen it many times. It’s all over the place this time of year, although you will find some people calling it a “muffin top” these days. Which is really more accurate anyway when it comes to the standard pumpkin cookie recipe. Fluffy, cakey and not at all the texture one thinks of when dreaming of cookies. When I think of a cookie, it should crispy around the edges, slightly undercooked in the centre, and chewy throughout. The perfect cookie texture, if you will. Apparently this is rather hard to achieve when it ocmes to a pumpkin cookie because of the added liquid involved in the pumpkin itself. It is quite watery when you add it to the batter.
I thought that there must be a way to solve this dilemma. Too much liquid…well, why not just get rid of that excess liquid then? You will still retain the orange hue and fall flavour of pumpkin, but at the same time, achieve a much better texture or crumb.
And so I set to work experimenting one afternoon. And this, my friends, is my gift to you. A perfectly crisp and chewy pumpkin cookie, accented by the wonderful spices we all know and love and a little surprise for extra zing. Enjoy!
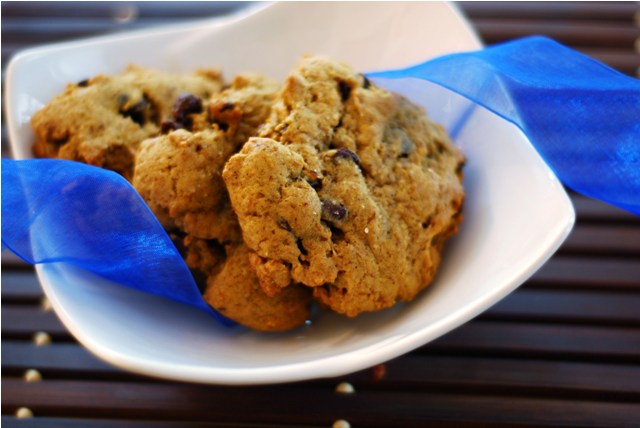
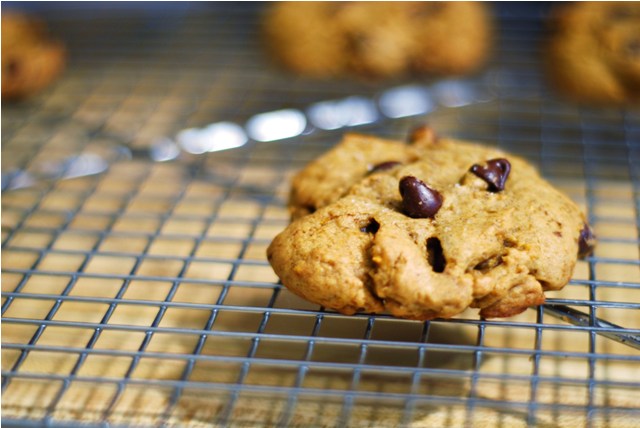
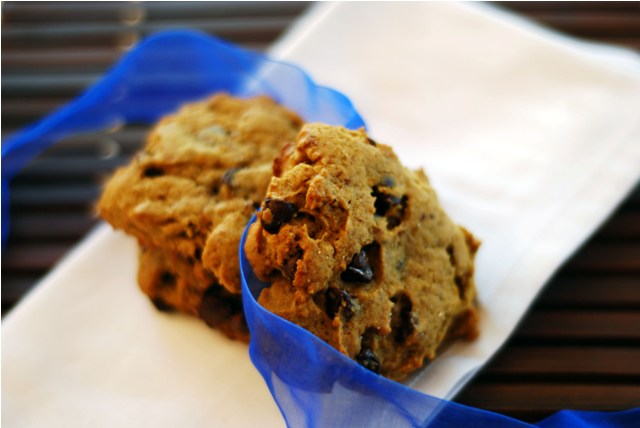
Chocolate Chip Pumpkin Cookies
1 cup butter
1 1/4 cups brown sugar, packed
1 cup pumpkin butter**
1 egg
2 tsp vanilla
2 1/2 cups flour
1 tsp baking soda
1 tsp cinnamon
1 tsp cardamon
1/2 tsp freshly grated nutmeg
1/4 tsp ginger
1 tsp salt
1 Tbsp orange zest
1 1/2 cups dark chocolate chips or chunks
fine grain sea salt, such as pink Himalayan (optional)
1. Cream butter and sugar in medium sized bowl.
2. Add egg, vanilla and pumpkin butter. Mix well.
3. In separate bowl, mix together dry ingredients. Add to wet and stir to combine.
4. Stir in orange zest and chocolate chips and set in refrigerator for 1 hour.
5. These cookies don’t spread much so be creative in making shapes. I went for a rough look by pulling out chunks of dough and loosely molding into cookie shapes. Sprinkle with sea salt before baking if desired.
6. Bake for 15-18 minutes in a 350°F oven.
Because these cookies are crisp and chewy fresh out of the oven, I recommend making them in smaller batches and freezing the dough for future use.
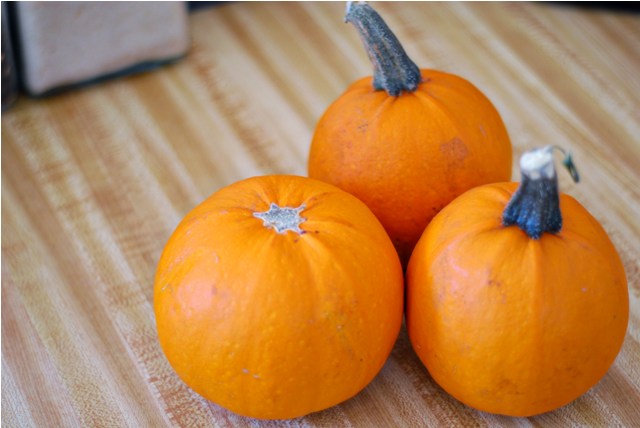
** To make the pumpkin butter:
Method #1. Dump one can of pure pumpkin purée (27-29 0z can) and one cup of brown sugar into a small saucepan. Heat on medium and continue to stir and reduce for 1 hour. When done, you should be left with about a cup + 2 Tbsp of very thick pumpkin butter.
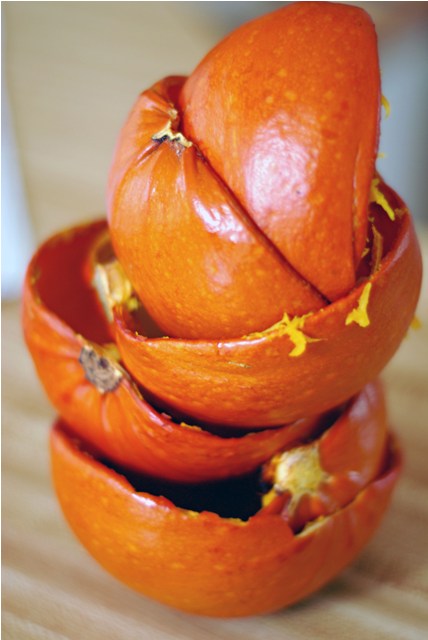
Method #2. Halve three small sugar pumpkins, scoop out the seeds and discard. Cut side up on a greased baking tray, bake in a 375°F oven for 45 minutes. Remove from oven, scoop out flesh and purée in food processor (there should be about 2 cups). Drain in cheese cloth by squeezing out the excess liquid. Add to small saucepan along with 1 cup of brown sugar. Cook down on medium heat for about one hour until very thick. Remove and set aside.


Remember, they don’t stay crispy and chewy forever. These guys are best served right away, or at least within 2 days. After that they begin to soften. They still taste great, but I chose to freeze two thirds of my dough in two small batches for later indulgence.
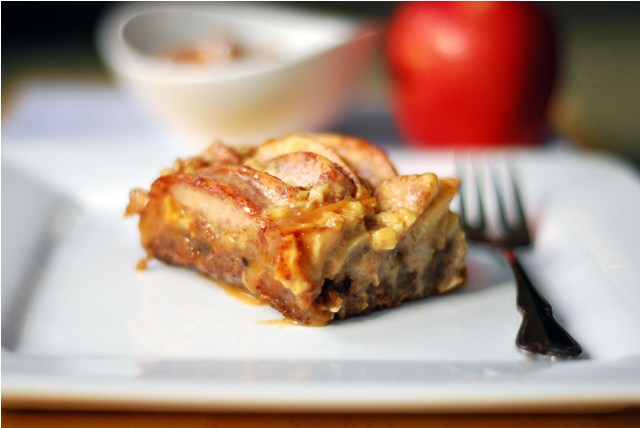
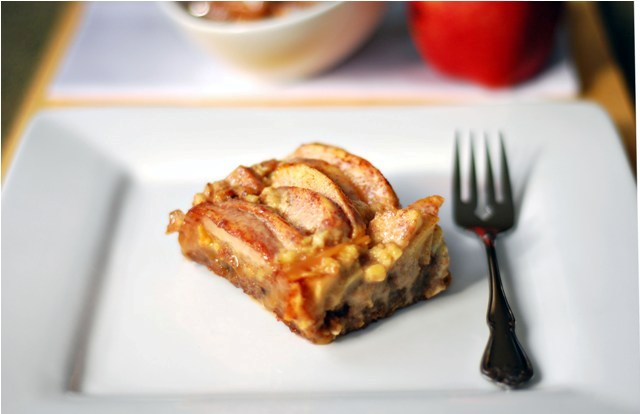
When company’s coming over for dinner, it’s nice to be able to offer something warm and comforting for the ever important, after dinner indulgence. Which is why I baked this caramel & apple cream cheese tart last weekend when some family was coming for a visit. We don’t often get visitors, what with living 35 minutes from the nearest city. It is isolating, but at the same time, the freedom that comes with living out in the middle of nowhere is very inspiring. Planning is key. You can’t leave the house with toddler in tow without two days worth of snacks and diapers, sippy cups and toys. Grocery lists are thorough and complete, keeping in mind you won’t be going to pick up that forgotten pint of cream anytime soon. Emergency supplies are well stocked in the garage and we’ve got enough firewood to keep us warm all winter long should anything catastrophic happen.
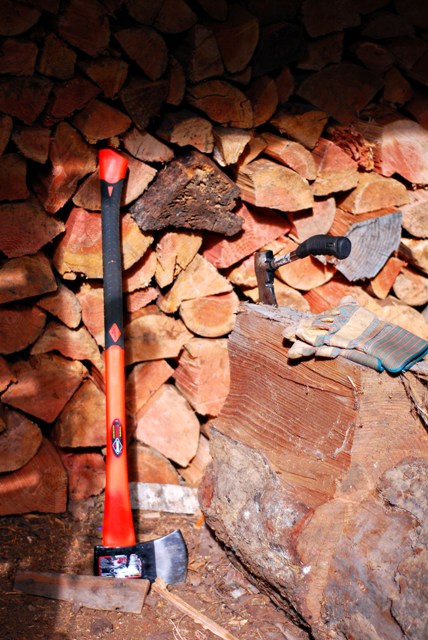
I stacked it all myself too. I didn’t say I chopped it. No, it came that way, well most of it anyway.
Lots of interesting things can happen when you don’t have the distractions of the city to pull you away. Maybe you have time to practice your cooking and baking skills, your photography skills, and even your rusty writing skills. Maybe you bring yourself a little closer to your childhood roots, embracing nature at every turn, and welcoming the life that comes along with rural living. There’s nothing quite like waking up to the cock-a-doodle-dooing of the neighbour’s rooster or the baaaaing of their purebred sheep. Interesting things can happen too, just take this next picture as an example.
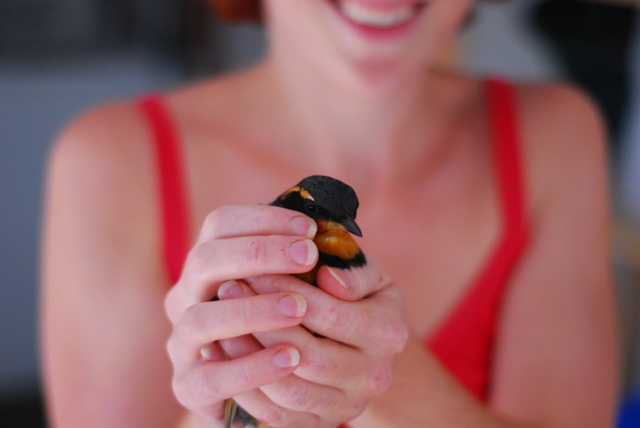
That poor, unfortunate fellow flew right into our living room window the other day. I just so happened to be sitting at the computer, writing a post, when “BANG!” I looked out the door next to me, to the deck outside, and there were feathers billowing around all over the place. I walked out onto the deck and there he was, lying on his back, feet in the air, completely stunned. I took him inside and let him rest in the laundry room, wrapped in a towel for a few hours. I checked on him every now and then, and gave him a little ramekin of water. For some reason though, he wasn’t interested in it. After a while, I figured he must be okay. Maybe it was when he started flying around the room, desperately attempting to peck his way through the windows. So I caught him and my husband snapped this photo. He’s been back a couple of times since then too, I think he must like me.

And then there’s this. This has to be my number one reason for living so far away from my favourite boutique stores, my favourite gourmet restaurants, movie theaters, restaurant supply stores, etc. To walk 30 seconds down my driveway, and another 2 minutes down the lane way to see this. What gorgeous beauty and such inspiration, right in my backyard. If I ever have to leave here, it will be a very sad day. But for now, I revel in it’s wonderful simplicity, it’s serene tranquility and I wonder how I ever managed to make it in the big, noisy city. Then again, some questions are better left unanswered.
Caramel & Apple Cream Cheese Tart
For the crust:
1 cup brown sugar, packed
1 cup unsalted butter, room temperature
1 tsp vanilla
1 egg
1 tsp cinnamon
1/2 tsp freshly grated nutmeg (or half a nut)
1/4 tsp ginger
1 tsp salt
1/2 tsp baking soda
1/2 cup graham cracker crumbs (8 whole crackers)
3/4 cup whole wheat flour
1/2 cup ground pecans
1/2 cup ground hazelnuts
1 1/2 cups quick cooking oats
3 tbsp buttermilk
For the cream cheese layer:
8 oz cream cheese, room temperature
2/3 cup confectioner’s sugar
1 tsp vanilla
1 egg
1/3 cup sour cream
For the apple topping:
5 large apples, peeled cored and sliced into 1/4″ pieces
1 tsp salt
1 tsp cinnamon
1 cup creamy caramel, melted (or make your own)
1/4 cup half & half (or light cream)
1. Cream butter and sugar in large bowl.
2. Add vanilla, egg and spices to butter and sugar. Mix well.
3. In bowl of food processor, pulse nuts and crackers until a fine crumb is formed. If using prepackaged graham cracker crumbs, simply measure out at this point.
4. When nuts are ground, mix together in another bowl with flour, graham cracker crumbs, oats, salt and baking soda.
5. Add dry ingredients to wet and stir to combine.
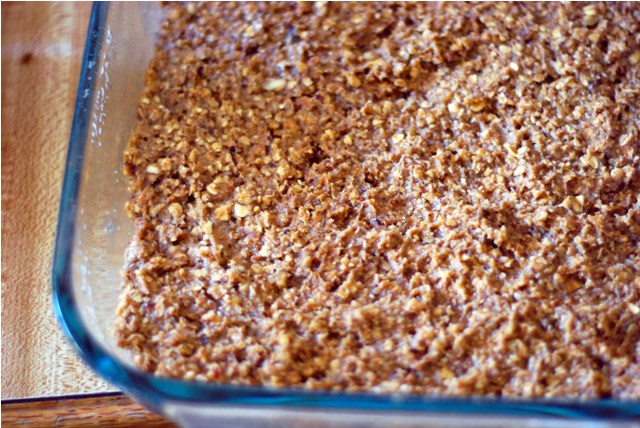
6. In a 9×13 greased, glass baking dish, add the crust and pat down evenly. Set aside.
7. In a small bowl, mix the cream cheese with the confectioner’s sugar until smooth.
8. Add the egg, vanilla and sour cream.
9. Pour over the crust, spreading it evenly with a spatula and set aside.
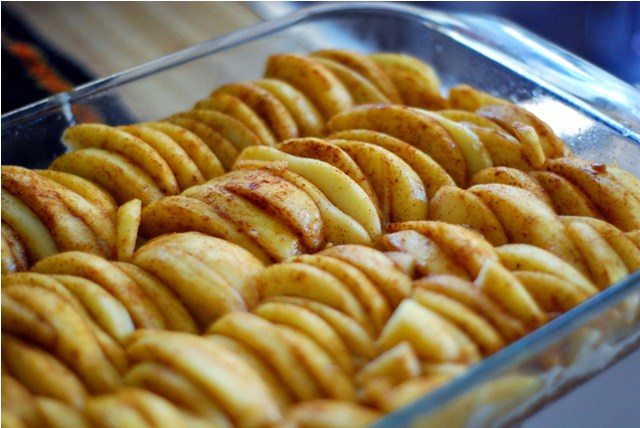
10. Toss the sliced apples with the salt, and cinnamon.
11. Lay the apples out over the top of the cream cheese layer like a deck of cards spread out on a table. One layered over the edge of the next.
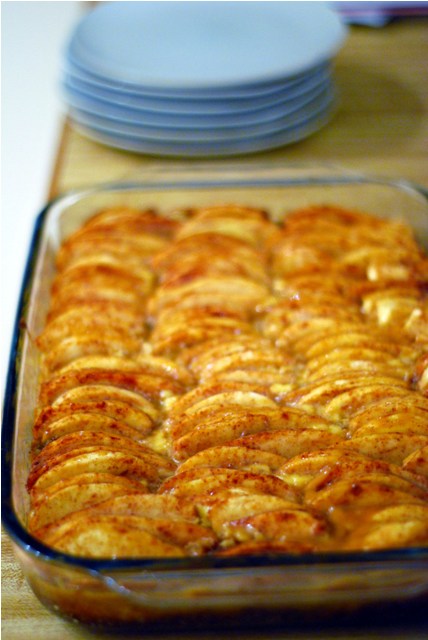
12. Bake in a 350°F oven for 45 minutes.
13. Melt caramels and combine with half and half.
14. Pour caramel sauce over the cooled apple tart and serve warm.
|

Hi! I'm Elizabeth. I like fitness, bad ass tattoos, food, bacon, chocolate, taking lots of silly pictures and my spawn. Check out my FAQ for all the usual Qs or send me an e-mail and tell me all about your cat and your Aunt Sally's amazing apple pie. |


