Breakfast for dinner. Whoever thought of such a wonderful concept has garnered my praise for years. Egss are extremely underrated in my opinion, if only for the fact that people have very limiting ideas of what to do with them. Toad in the Hole, scrambled, fried, sunny side up, boiled soft or hard, etc. There many wonderful things to do with eggs, the least of which is to serve them in a hurry at breakfast.
I find I enjoy eggs more for dinner because I savour them for a longer period of time. My husband and I, for economic reasons, used to have soft boiled eggs with toast soldiers as our Friday night dinner for a few months, about a year ago. We’d be exhausted from daily life with a 9 month old, the rigamorale of the day to day grind and just your basic personal upkeep of a household. It was almost my favourite meal of the week. 5 minutes to make (after the kid went to bed) and 10 minutes to savour one of my most favourite of childhood treats. There’s something very clean and simple about toast soldiers dripping in butter, being dipped into perfectly runny, golden yolks. From those hectic days, sprouted new found love for the humble egg.
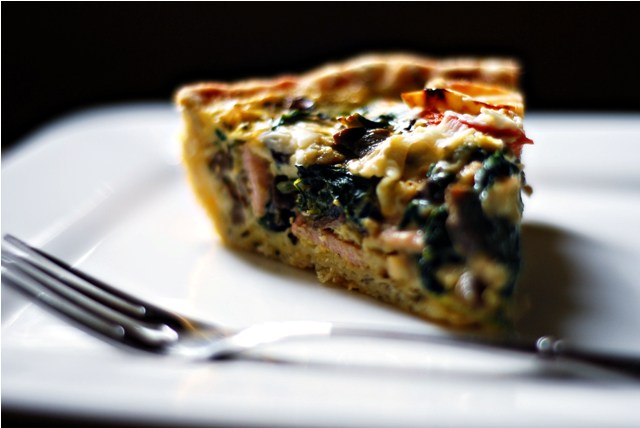
I’ve always been more of a fritatta kind of girl, but I find the crustless factor and tendency to be a bit dry less appealing then the rather sexy, crust encased, quiche. Sexy? Quiche? Yes, that’s right. Eggs can indeed be sexy. When dressed up in lovely mushrooms, exotic soft cheeses and herb scented, flaky, all butter crusts, eggs can induce a certain amount of fervor in me.
Fully Loaded Quiche
For the Savory Crust
4 oz cold, unsalted butter
6 oz all purpose flour
1/2 tsp sugar
3/4 tsp salt
1/4 cup fresh rosemary, minced fine
1/4 cup buttermilk
1. Cut into butter into 2 cm pieces and freeze for 10-15 minutes. Measure out buttermilk and refrigerate.
2. Sift flour, sugar and salt into bowl and stir in rosemary. Take cold butter and dump into flour, toss to coat.
3. Dump onto work area and roll butter pieces with rolling pin.
4. When all butter is flattened and it looks like a big shaggy mess, throw it back into the bowl and put it in the fridge for 10 minutes.
5. Remove from fridge, make a well and pour in buttermilk. Bring dough together with hands, making sure to moisten all of the flour. It will be a big shaggy mess.
6. Form into flat disc, wrap in plastic and put in fridge for 1 hour.
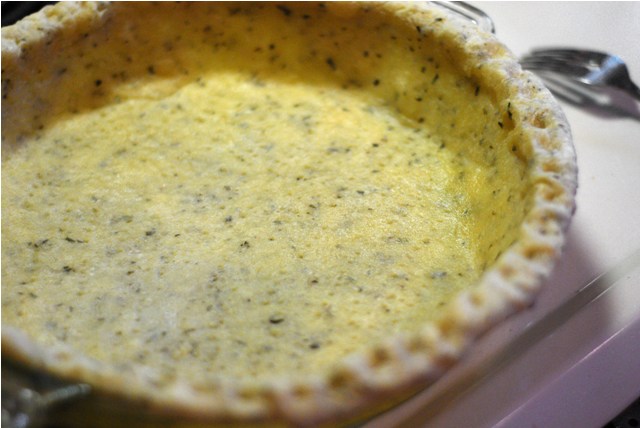
7. Preheat oven to 350°F.
8. Roll out dough on floured surface to about 12″ around and no thicker than 1/4″.
9. Line a 9″ pie plate with dough, folding and crimping edges.
10. Line dough with parchment paper or tin foil and weigh down with dried beans, rice or baking weights.
11. Bake 15 minutes, remove weights and liner, dock dough with a fork and bake another 15-20 minutes more or until a light golden brown.
12. Remove from oven, set aside to cool. Meanwhile, make the filling.
For the Quiche Filling
1 recipe savory crust
2 Tbsp Butter, divided
1 large shallot, minced
1 large clove garlic, minced or grated
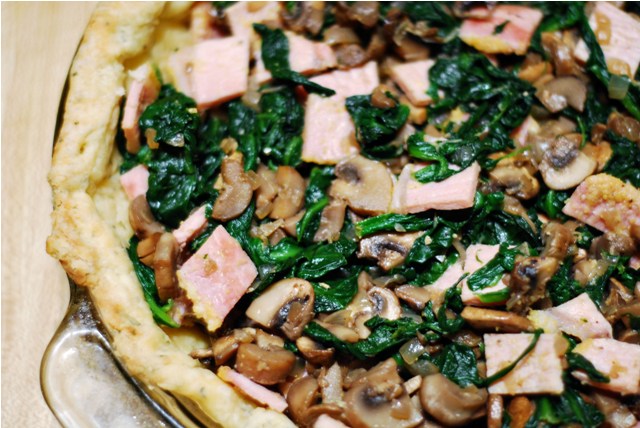
1 lb mushrooms, diced
6oz spinach, roughly chopped or torn
150-200g peameal bacon (if unavailable, try Canadian bacon)
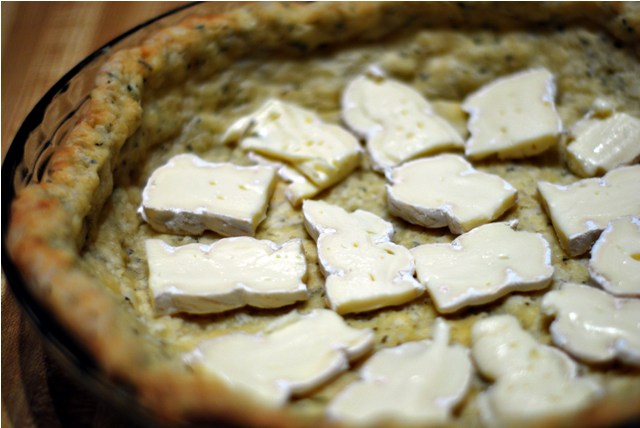
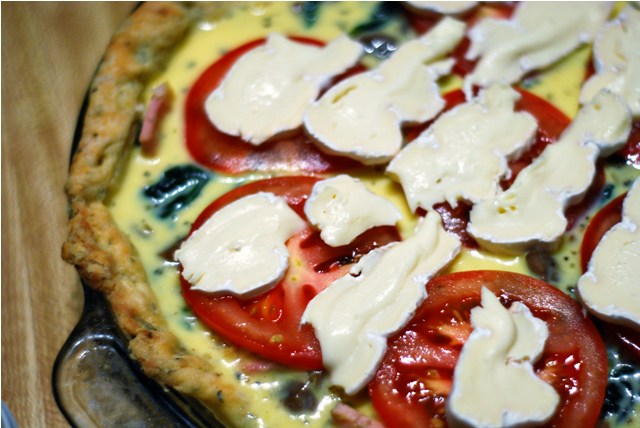
150-200 g Brie, sliced
4 large eggs
1/2 cup buttermilk
1/2 cup whole milk
salt & pepper
1/2 tsp dried basil
1/2 tsp dried Greek oregano
1 large tomato, sliced
1. In large sauté pan on medium high heat, sauté bacon for 1-2 minutes per side, or until slightly browned. Set aside to cool, then chop into large pieces about 2cm x 2cm. Toss into a medium sized mixing bowl.

2. In same sauté pan, add 1 Tbsp butter, garlic, shallots and mushrooms. Sauté on medium high for 8-10 minutes, or until all liquid has been cooked out of the mushrooms.
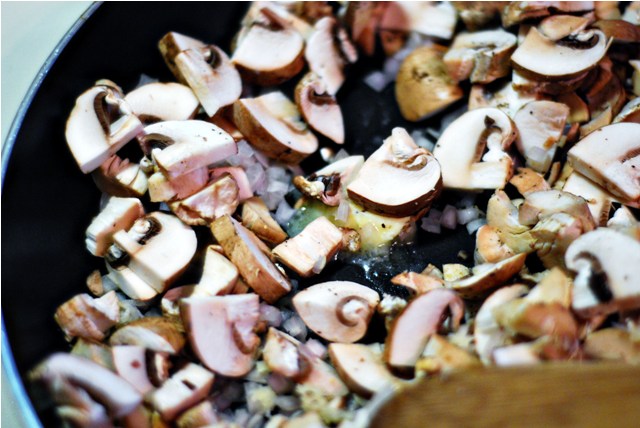
3. Remove from pan and add to bowl with bacon in it.
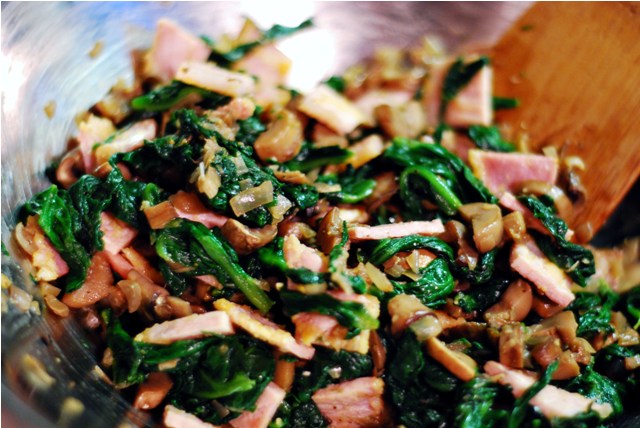
4. In same pan (again), add 1 Tbsp of butter and sauté spinach until all liquid has been cooked out.
5. Toss in bowl with other ingredients and season with salt and pepper.
6. In separate bowl, mix eggs with buttermilk and whole milk. Season with salt, pepper, basil and oregano.
7. Line crust with half of Brie. Pour in the vegetables, then the egg. Top with slices of tomato and remaining Brie.
8. Bake in 350°F oven for 35-45 minutes or until center is just set.
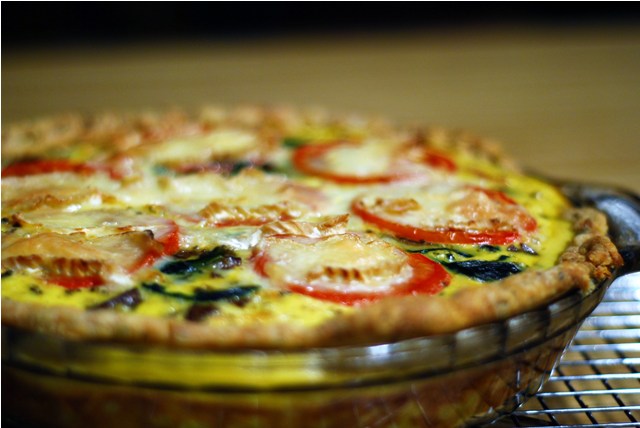
9. Allow to cool on a wire rack for 10 minutes prior to cutting into it.

This quiche is excellent heated up the next day in the oven for 10-15 minutes. It’s quite large, so there were a few pieces left over, though they only lasted a day. Very, very good flavours.

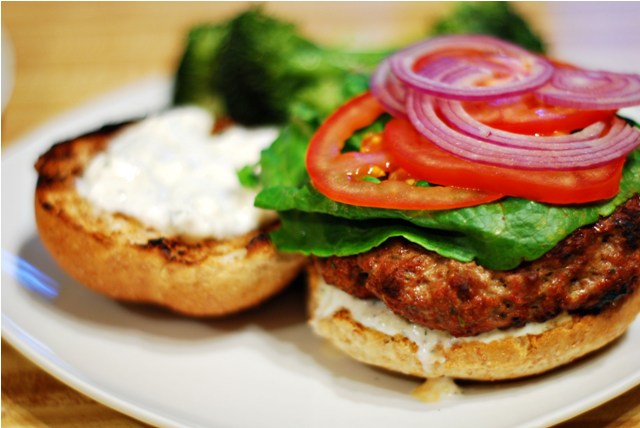
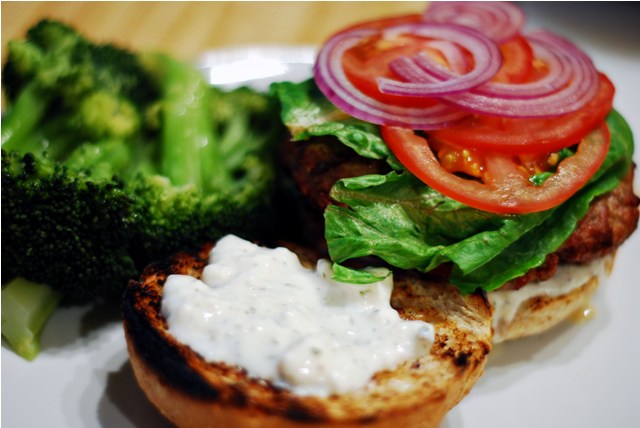
Sometimes, you just feel like having a burger. I love burgers, all of them, in any incarnation. Beef, pork, lamb, chicken, turkey, portobello, sometimes even veggie patties. I don’ t know what it is about burgers, they just seem to have universal appeal. Who doesn’t like sinking their teeth into a perfectly crusty bun, slathered in your favourite condiments, teetering with just enough toppings and getting down to that juicy, flavourful patty? It’s truly a heavenly experience n’est pas?
I was having one of those cravings the other night and decided to make lamb burgers. I usually make good old fashioned beef, but I just couldn’t get the thought of lamb and feta and creamy sauce out of my head. You can tell just how excited I was to actually eat my sumptuous burger by my seriously lacking photos. I wanted that burger while it was hot and juicy and I just couldn’t get the camera to focus fast enough. You get the idea.
These burgers would be even more fabulous served up with some deliciously crisp baked fries with aioli. An all time favourite combination of mine. Whatever you decide to pair with these burgers, just make sure it’s small. I don’t make no sissy burgers.
Yogurt & Feta Sauce
150g goat feta
1/2 cup no fat plain yogurt
1 clove garlic, grated or minced
juice of half a lemon
pepper
1/4 tsp fresh mint, chopped fine
1/4 tsp dried dill weed
1. In a small bowl, combine all ingredients. Mix well and set aside in refrigerator for at least an hour. It needs time to let the flavours combine.
2. Meanwhile, make the burger patties.
Greek Lamb Burgers
1 lb ground lamb
1 tsp Greek oregano
1 egg
1 Tbsp fresh rosemary, chopped very fine
salt & pepper
1 clove garlic, grated or minced
1/2 cup bread crumbs
1 tsp Dijon mustard
1. In a mixing bowl, mix together all ingredients.
2. Form into patties of desired size and set aside on plate.
3. Grill on BBQ or indoor grill for about 5-8 minutes per side.
4. Serve on warm crusty buns with a little lettuce, tomato and red onion or whatever floats your burger boat.
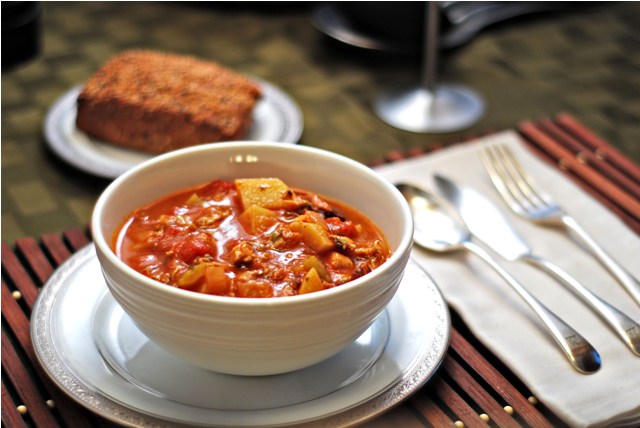
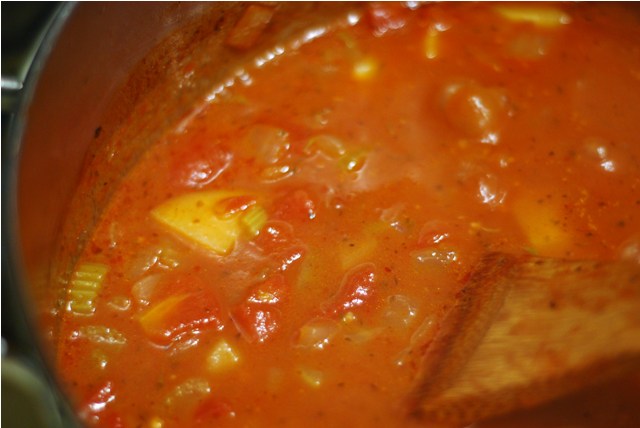
Sometimes I set out to make one thing, and I end up making a completely different beast. This is just one of those times. This weekend, I set out to make a delicious Manhattan clam chowder. As a child, when traveling on the widely despised BC Ferries in order to leave this rock, I would be confronted with cafeteria food. Now, as a child, I wasn’t too picky about what I ate. I do admit I was probably just as bad as any other kid, but I was by no means a food snob at the tender age of 12. One of the staples of the ferry’s cafeteria (even to this day), is a rather salty, bland and corn starch thickened, Manhattan clam chowder. The “red one” as some people put it. It’s hard to get a clear definition of what a chowder is, but I usually take it as a thick soup (almost a stew) that is thickened with potatoes and usually contains seafood and bacon.
What I set out to make was a sort of seafood filled, stew-like (in consistency) soup with lots of flavour but not too hard on my thighs. I’m leaving that to the three hundred mini chocolate bars and little packets of candy in the bowl on my counter. It practically sings to me every time I walk by. It may be the only part about Hallowe’en that I do enjoy. Who doesn’t like candy and chocolate? And if you don’t, what, pray tell, are you doing here?
As I was saying, a had been dreaming of this chowder, when it occurred to me that it’s similar to a Cioppino. If you are in the dark here, a Cioppino is an Italian fisherman’s stew/soup. Usually made, historically, from the leftovers of the day’s catch. Mostly, the seafood was thrown in whole to add richness to the broth. As in clams with shells on, crabs, ditto. Personally, I don’t have the luxury of buying huge amounts of expensive seafood. It’s a bit of a tease really, living on the coast surrounded by fresh seafood. Most of the good stuff here is a bit out of reach, reserved for special occasions and a headline at the meal. I’ll stick to buying sustainable, yet affordable varieties. If you do wish to expand this stew, see notes at the bottom of the recipe.
Manhattan Cioppino
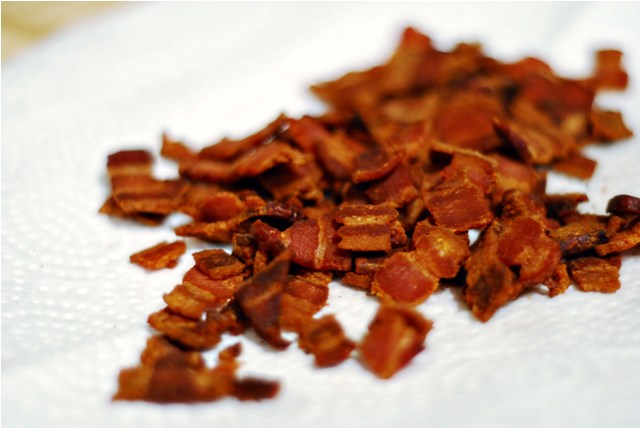
6 slices thick cut bacon, diced
2 stalks celery, diced
1 clove garlic, minced
1 Yellow or sweet onion, diced
1 lb potatoes, peeled and diced (I prefer Yukon gold)
1 28oz can diced tomatoes in juice
1 5.5 oz can tomato paste
900mL Chicken stock (or even better would be homemade fish stock)
1 tsp each dried basil, marjoram and thyme
salt & pepper
1 Bay leaf
1/4 cup red wine
1 tsp Worcestershire sauce
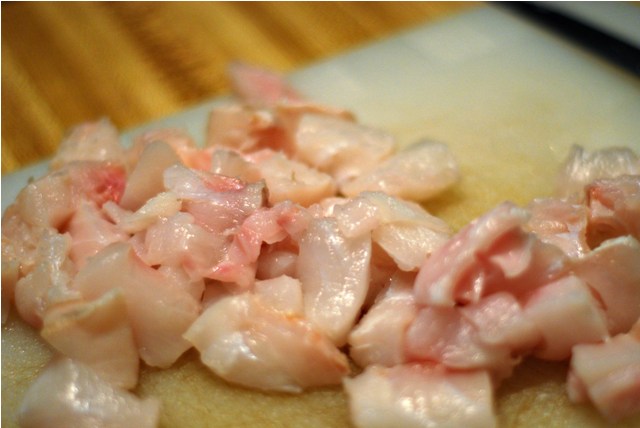
1/2 lb (or more) halibut or other white fish
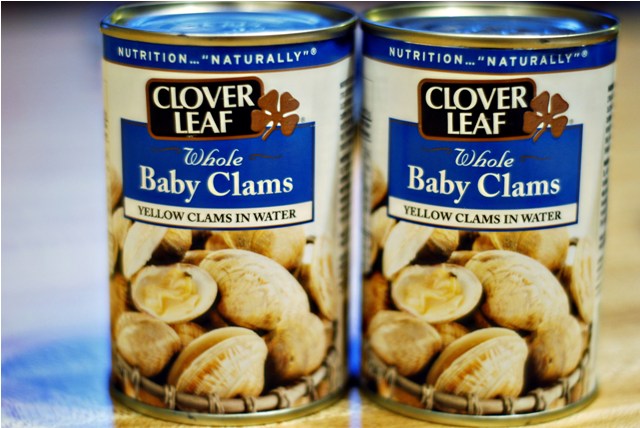
2 142 g cans whole baby clams in water
1. Sauté bacon in deep saucepan until crisp. Remove to paper towels to drain. Set aside.
2. Pour out all but 3 Tbsp. bacon grease.
3. Sauté garlic, onion and celery in bacon grease until softened, about 5 minutes.
4. Add potatoes and sauté another 5 minutes.
5. Add wine and simmer for a minute or two. Add tomatoes, tomato paste, herbs, stock and Worcestershire sauce. Simmer for at least 1 hour and up to 2 hours.
6. Add in clams and halibut & simmer for 20-30 minutes. Add bacon in final 5 minutes.
7. Serve with crusty bread.
** Note: To make a more rustic Cioppino, try using clams in the shell and adding more seafood such as crab, prawns, shrimp, other kinds of white fish, etc.

Happy Hallowe’en folks! I know, I know, no Hallowe’en post? No scary dirt and worms or cupcakes shaped like spiders? No mummy dogs or kitty litter cakes? Sorry, I’m just not that into Hallowe’en. I used to be, dressing up in sexy outfits, hitting up the bars and clubs with my girlfriends. Those were the days. Now I’m kind of stuck in the middle though. I have a young toddler, who has no idea what’s going on, plus I don’t want to freak him out too much. Of course I love giving away (and eating) candy, but other than that, it’s just a regular day. We’ll be celebrating by attending the village’s annual bonfire, heading to a friend’s house, making escargot and fondue and giving away buckets of candy. I may even be dressed as a cat. Not a sexy cat mind you, more of a Disney type costume, complete with leg warmers and giant fluffy head. I’m a Mom now you know…
Maybe when the wee one is at a more understanding age, then we’ll get into it. For the meantime, it’s just another holiday that requires me to spend inordinate amounts of money and spend too much time decorating. I like to save it all up for Christmas. I’m one of those annoying Christmas freaks. I could start celebrating in July. I love every minute of it, and this year will be no different.
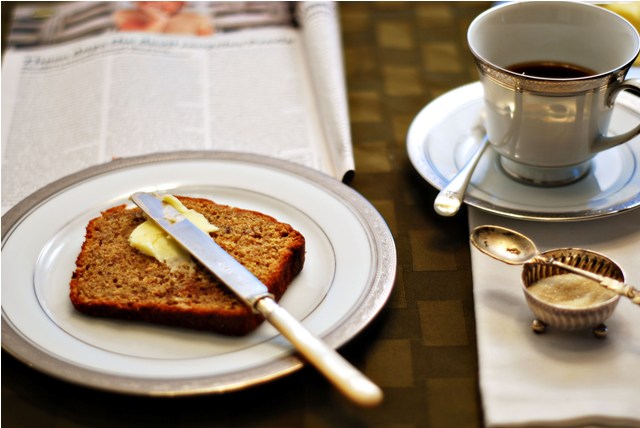
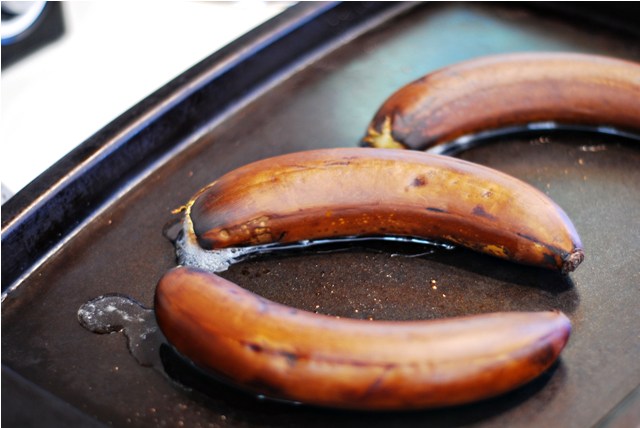
So I leave you with my very favourite, personal recipe for Banana Bread. When I was a kid, I used to make banana bread all the time. My Dad loved it, and so did I. But this time, I decided to tweak it a little. Brown butter makes everything better, as you may have learned if you’ve been reading this blog for a while. Also, I wanted to make that banana flavour just a little bit stronger and more robust, so I roasted them. If you like banana bread, but use it mainly to get rid of old bananas, try this recipe out. It would also make really good muffins, just remember to shorten the baking time accordingly.
Brown Butter Roasted Banana Bread
3 medium bananas
1/2 cup butter
1 cup brown sugar, packed
3/4 tsp salt
1/2 cup sour cream
1 tsp baking soda
1 cup cake flour
1 cup whole wheat flour
1 tsp cinnamon
1 tsp vanilla

1. Roast bananas whole with peel on for 15-20 minutes in a 350°F oven.
2. Grease an 8″ x 4″ loaf pan.
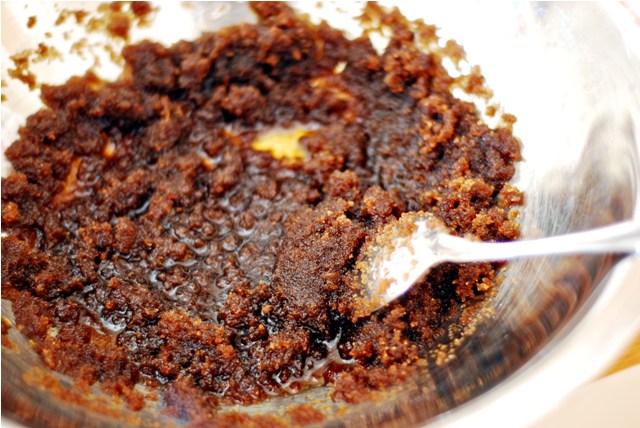
3. In small saucepan, melt butter over medium high heat. Do not stir, instead swirl the pan and watch until it begins to foam. Once the foam begins to subside, and the butter has browned sufficiently, remove from heat and set aside.

4. In medium sized mixing bowl, stir together brown butter, salt and sugar. It will look like this, kind of separated. That’s okay.
5. Stir the sour cream and vanilla into the sugar/butter mix. Mash bananas and add in as well (chunks are okay!).
6. In separate bowl, mix together the flours, cinnamon and baking soda. Stir until well combined.
7. Add the flour to the wet mix in two portions, but try not to over mix.
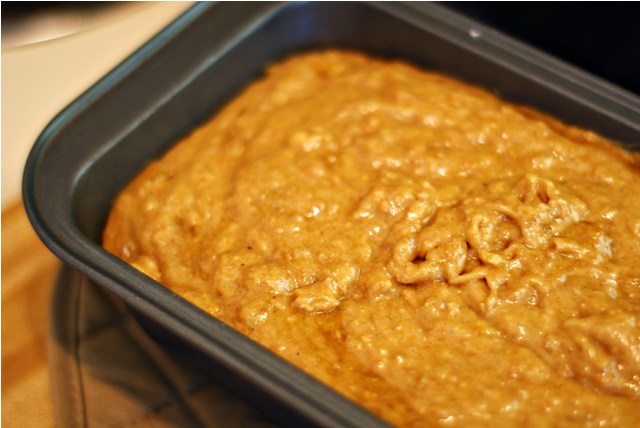
8. Pour into greased loaf pan and bake for 45 minutes to 1 hour (in the already preheated to 350°F oven).
9. Cool 5-10 minutes in pan before turning out onto cooling rack. Turn upright and allow to cool completely, although you will be able to cut into it while it’s till warm.

10. This bread is awesome toasted with butter, cream cheese or even Nutella.
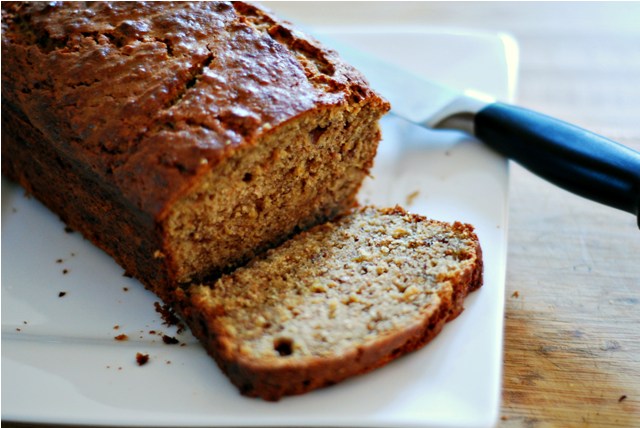
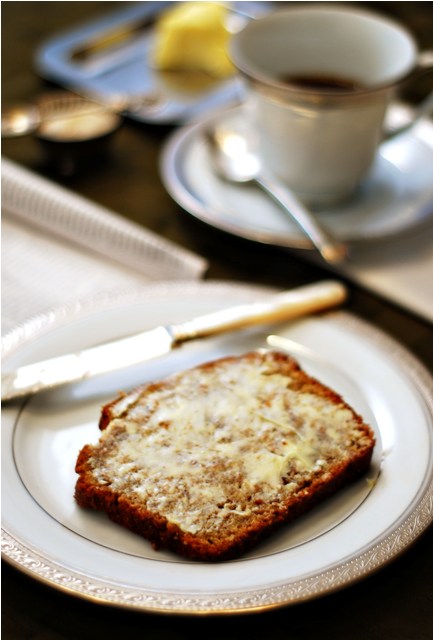
What? You’ve never had banana bread for breakfast? It’s healthy…enough. It’s got bananas, and whole grains, what else could you ask for right?
Today is a bit different than most. Normally, I would wax poetic about a subject I’m feeling particularly passionate about, like the changing colours of the leaves outside, or the fact that I’ve had two awful colds blindside my household in one week, or that I have a month worth of magazine subscriptions piling up on my coffee table. You see, a lovely glimpse into my world. But no, today I will delve even deeper, telling you things I don’t normally talk about. Read: Not normally food related.
In one week, I’ve had the absolute honour to receive not one, not two, but three (!) Kreativ Blogger awards…Yay! Here they all are:
  
I was awarded the first by Janis of Bite Me New England, the second by Shelley of Experimental Culinary Pursuits and the third by Jenn of Sweet Water. So thank you to all three of you. I’m very surprised and flattered. It always feels nice to be recognized by your fellow community members.
Now on to the skeptic in me. I love that I’ve been given these awards, but I am not in love with the “chain letter” aspect of the rules. The rules are such:
*You must thank the person who has given you the award.
* Copy the logo and place it on your blog.
* Link to the person who has nominated you for the award.
* Name 7 things about yourself that people might find interesting.
* Nominate 7 other Kreativ Bloggers.
* Post links to the 7 blogs you nominate.
* Leave a comment in the nominated blogs to let them know they have been nominated
That’s a whole lot of things you need to do to be able to accept this prestigious award, in my humble opinion. So after a little Googling into the origins of this award, I found these lovely articles:
In Search of Dutchland- Kreativ Blogger “Award”
Simon Food Favourites – Original Designer of the Kreativ Blogger Award
These two bloggers, who were also a little skeptical, spent some time digging into the origins. Turns out a very nice woman from Norway, Husfraus Memoarer, started it in May 2008. Not as a chain letter type award thingy, mind you, but as a true award, given to her sister and three friends for their inspiring creativity. Now Google translator works it’s magic in it’s own little ways, and I’m not so fluent in Norwegian, but it doesn’t look like there were any rules attached to this award when it first started.
I’m not a cynic, really! Okay, well maybe a little. I’m one of those people that never sent chain letters, ever. I’ve had a Hotmail address dating back to 1995! I was 12. I still never forwarded chain letters, even the ones that said I might die a horrible death a million times over or my crush would never go out with me if I didn’t pass it on. Hooey I say!
Anyway, I do want to forward the award on, although I won’t be sending to 7 people. I will send it to four people I truly admire and I’ll make no big stink if the recipients don’t wish to participate. Simply saying thank you is good enough for me! Okay and I’ll tell you a couple little tidbits about me too, if you insist!
1. I have scoliosis and have two 18″ stainless steel rods surgically fused to my spine. I had the surgery when I was 13, and it probably saved my life. I am somewhat limited in side to side bending and I can’t arch my back backwards, but I can touch my toes, so I can’t say I feel like I’m missing out too much. Besides, I carried my son to term and delivered him naturally, sans epidural, booyah! Nothing can stop me!
2. I’m afraid of closets at night. My husband is always leaving our son’s closet door open and when I go in there to deal with him in the dead of night, it freaks me right out! I don’t know why. What could be in there besides deadly spiders right?
3. I used to be very overweight. Like a lot. I was the fat, socially awkward girl in high school. Through the magic of Weight Watchers for the initial weight loss and the thorough embracing of eating local, seasonal food, I have now been a svelte and trim, healthy weight for going on 7 years. I’ll never look back.
Okay on to my recipients for this award:
Melody Fury from Bouchon For 2 – Amazing recipes, great food photography and always fun to read. Mel’s got it all!
Paula Jones from Bell’alimento – simply fabulous food that need not be complicated.
Ashley Rodriguez from Not Without Salt – Amazing photos, great recipes, and creative posts about family to break it all up.
and finally:
Kamran Siddiqi from The Sophisticated Gourmet – He’s 17, his photos are amazing, need I say more?
I applaud you all in your efforts to carve out your own little niche in this overpopulated and sometimes unwelcome world of food blogging. Congratulations!
Now on to the food, shall we?
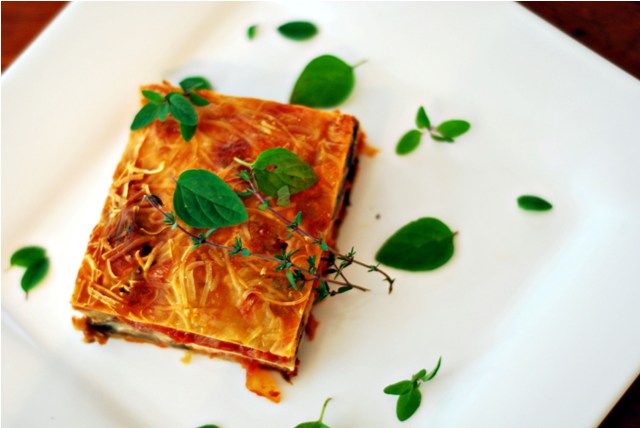
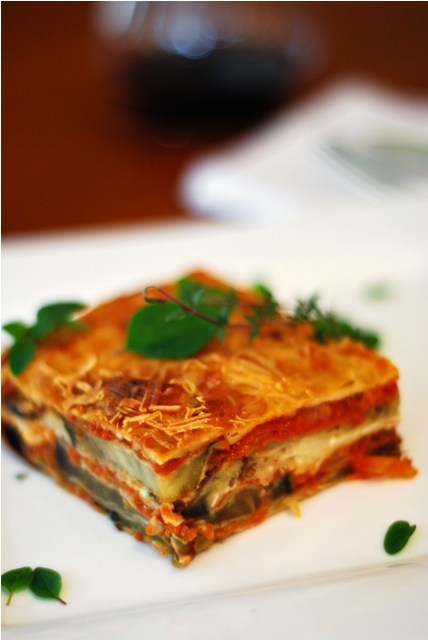
My Mother had a lot of signature dishes when we were growing up. Not to say we ate the same thing every night of the week, but there were repeats, as there is sure to be when the feeding of a family is involved. One of my favourites was Eggplant Parmesan. It could have been the sheer amount of cheese involved in this dish, or the comfort factor, or the intoxicating aroma permeating the house as it bakes in the oven. Whatever it is about this dish that everyone loves, my favourite is it’s adaptability. Any dish involving tomato sauce can be customized to so many varying degrees of tastes. I like my tomato sauce deep, robust and having a life all it’s own. It works very well in this dish, and all the flavours meld together beautifully. You could always use bottled sauce if you are in a hurry, but the next time you have some spare time, promise me you’ll make this sauce. You will not regret it.
Eggplant Parmesan
6 Large vine ripened tomatoes (this time of year will, most likely, be greenhouse grown)
2 Tbsp Canola Oil
salt & pepper
2 large eggplants
1 clove garlic, minced
1 large sweet onion, diced
1 can tomato paste (5.5oz)
1 tsp dried Greek Oregano
1 tsp dried thyme
1 tsp dried basil
1 bay leaf
Parmesan rind (optional)
1/2 cup water
1/4 cup red wine
2 eggs, beaten well
1/4 cup milk or water
2 cups all purpose flour
salt & pepper
Canola or Grapeseed oil
400g mozzarella, grated
150g Parmesan, grated
1. Remove end from eggplant and slice into 1/4″ rounds. You can peel the eggplant if you want as well. Salt both sides liberally, lay on layers of paper towel or kitchen towels and cover with more layers. Weigh down with plates to remove excess water and let sit for 1 hour or more.
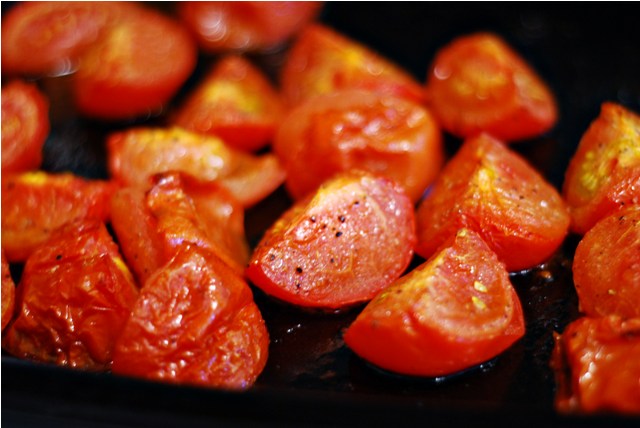
2. Meanwhile, cut tomatoes into quarters and toss in a bowl with 2 Tbsp of high heat oil and salt and pepper. Roast at 450°F for 15 minutes on bottom third of oven, broil for an additional 5 minutes at end. Remove from oven and set aside.
3. Heat oil and sauté onion and garlic in large, heavy bottomed saucepan. Dice up roasted tomatoes and add to pan (along with any juices that escaped while chopping). Sauté for an additional 5 minutes. Add in can of tomato paste, herbs and 1/2 cup water.
4. Add in Parmesan rind and 1/4 cup red wine, stir to combine and set to simmer for 30 minutes.
5. Remove towels from eggplant and brush away excess salt. You can blot away any additional moisture that is visible as well.
6. Make egg wash by mixing 2 eggs with water or milk in small bowl. Set near stove.
7. Fill another plate or bowl with flour mixed with salt and pepper. Set near stove alongside egg wash.
8. On other side of stove, set up a plate lined with paper towels to blot away excess oil from finished eggplant slices.
9. In large sauté pan on medium high, heat at least enough oil to cover bottom of pan 1/4 – 1/2″ deep.
10. Dredge eggplant slices in egg first, then flour, then lay in hot pan. Fry for a minute or so and then flip over. You want the slices to be nicely browned and crisp.
11. Remove from pan to paper towel lined plate, and blot dry. Continue with all remaining eggplant.
12. Line the bottom of a 9 x 13 glass baking pan with eggplant. You will probably have enough to lay each eggplant edge over the last, and so on, somewhat like a deck of cards.
13. Pour half of tomato sauce over eggplant and top that with half the mozzarella and half the Parmesan. Repeat with remaining eggplant, sauce and cheese.
14. Bake at 350°F for 45 minutes or until top is browned and bubbly.
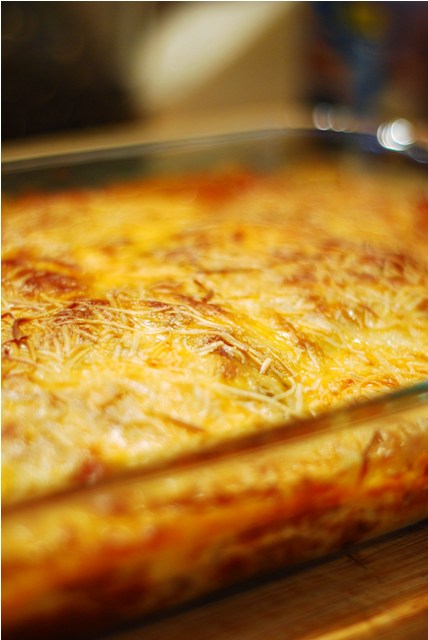
I like to serve this by itself, as it is a bit of a heavy meal, but it would be especially delicious with a side of steamed or sautéed vegetables, or a light salad. If your feeling like really getting into the unhealthy side of this dish, serve it up with a big ol’ slab of crusty garlic bread, delicious!
|

Hi! I'm Elizabeth. I like fitness, bad ass tattoos, food, bacon, chocolate, taking lots of silly pictures and my spawn. Check out my FAQ for all the usual Qs or send me an e-mail and tell me all about your cat and your Aunt Sally's amazing apple pie. |


