I’d like to tell you that I am planning in advance for the upcoming holiday of love, Valentine’s Day. I’d like to tell you that I thought long and hard about what was a perfect Valentine dessert. I’d like to tell you I did not eat two pieces of this last night….but then I would be lying to you. In reality, I wanted cake, and so did the hubby. When hubby wants cake, and I can’t see a reason why I shouldn’t also have cake (besides a large uptick in the number on the scales beneath my toes), then cake must be baked!
I have been talking about making a red velvet cake for a long time, but had never tried. I originally wanted to make cupcakes, but they are harder to store in my tiny fridge. Cupcakes would be a nice way to say “I love you, but not so much that I want you to eat a whole cake with me”, ’cause that is true love, just ask Mr. Guilty. But in case you do want to make a whole cake, say for a large family, or a pregnant women, I have left the default recipe as a cake. There are instructions at the bottom of the recipe regarding turning them into cupcakes.
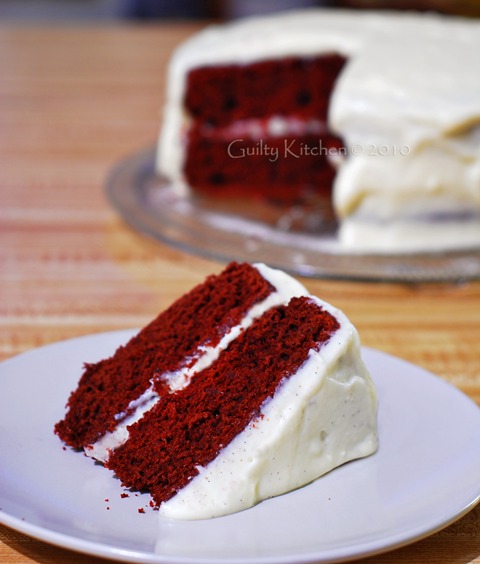
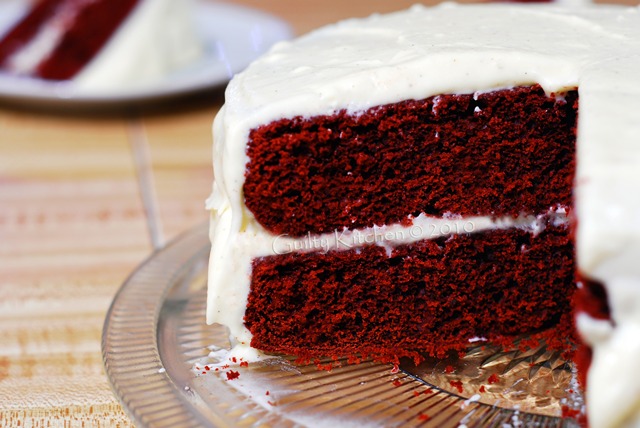
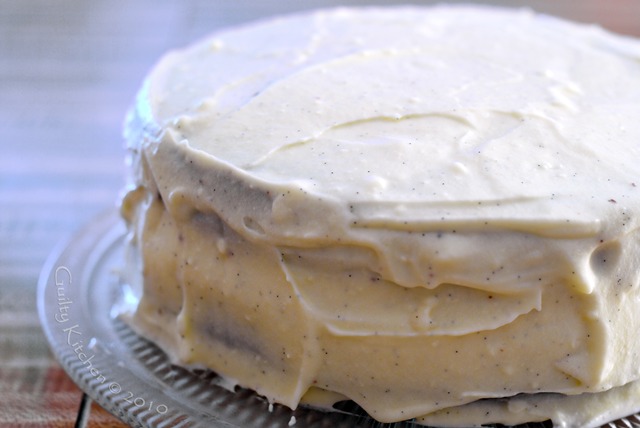
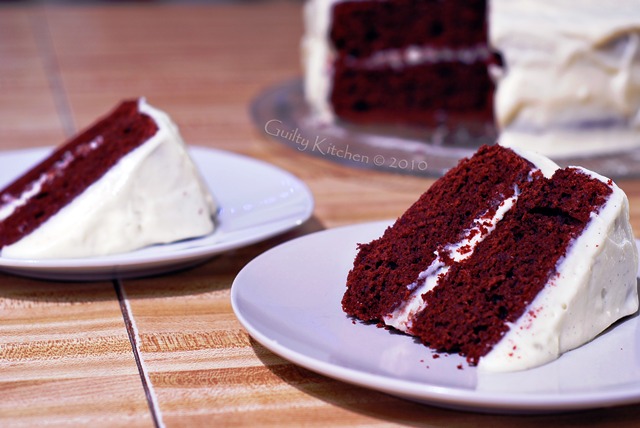
I based this recipe on the mocha cake I made for Mr. Guilty’s birthday last year, so it is not your traditional Red Velvet Cake. Most recipes for Red Velvet cake contain such a negligible amount of cocoa, that they might as well just be buttermilk cakes, but I like me some chocolate, so I went with my little heart’s desire. The frosting is not your typical cream cheese frosting either. If you’ve ever made any of my cake recipes, you may have noticed that this family prefers a lighter taste. We don’t appreciate overly sticky, thick frosting for our light as air cakes, we much prefer a lighter variation. The addition of whipped cream makes the frosting lighter, but it also makes the frosting a bit more runny. So if you plan on transporting this cake (or cupcakes) you may want to leave out the whipped cream and make the more traditional variation.
Feel free to add more red dye as you see fit, as this turned out a mildly red colour, but it could have been stronger (I ran out of colouring!).
Red Velvet Cake
1 cup dark brown sugar, packed
1/2 cup white sugar
3/4 cup butter, softened
2 eggs
2 cups cake flour
1/2 cup + 2 tbsp cocoa
1 tsp baking soda
1 tsp baking powder
1 tsp salt
1 cup buttermilk
1 tbsp red food colouring
2 tsp vanilla extract
1 tsp white vinegar
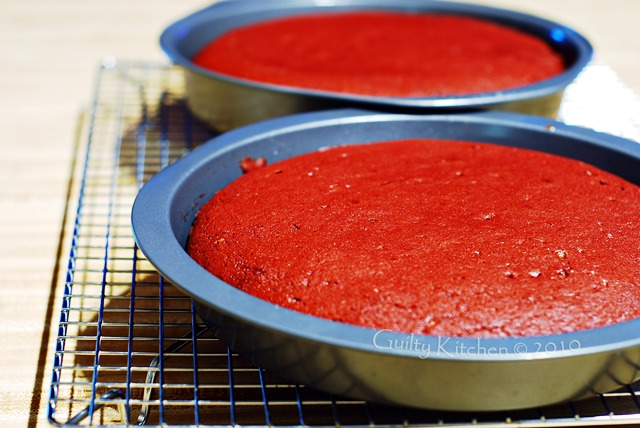
1. Preheat oven to 350°F. Grease 2 9″ baking pans and line the bottoms with parchment paper. Set aside.
2. Beat butter until fluffy, add sugar and beat until incorporated.
3. Add eggs one at a time, scraping down sides of bowl until fully incorporated.
4. In large bowl, mix together flour, cocoa, baking soda, baking powder and salt. In separate bowl, mix together buttermilk, vinegar, vanilla and food colouring.
5. Add half of dry ingredients to butter/egg mix, then half of wet. Repeat process until all is mixed together.
6. Pour into lined baking sheets and bake for 22-25 minutes.
7. Remove from oven and allow to cool on baking rack in pans for 5-10 minutes. Remove from pans by inverting onto cooling rack and allow to cool completely before decorating.
Fluffy Cream Cheese Frosting
1/2 cup butter, softened
8 oz cream cheese, softened
1 cup whipping cream
1-2 cups icing sugar
1 vanilla pod
1. In bowl of electric mixer, beat whipping cream until light and fluffy. Set aside.
2. Clean bowl and add butter and cream cheese. Beat until fluffy.
3. Slowly add in whipping cream until incorporated.
4. Add in vanilla pod and sugar to taste.
5. Decorate cake!
**Note: To make cupcakes line baking trays with liners and fill 1/2-3/4 of the way full. Bake for 15-18 minutes. Allow to cool for 5 minutes in pans before transferring to cooling rack. Decorate when completely cooled.


wonderful! my wife makes a red velvet cupcake based off the Waldorf Astoria’s recipe from NY… so moist like the looks of your cake. cream cheese frosting, mmm….
I can’t wait to try this recipe. I’ve been thinking about Red Velvet for Valentines!
.-= Tiffany Rosenberger´s last blog ..Weekly Cup of Rant – Super Organized Women =-.
looks sinful and delicious! i’ve always wanted to make a red velvet cake, valentine’s day is the perfect occasion! 🙂
.-= Nadia @ for the love of yum´s last blog ..A Real Treat: Sweet Potato and Herb Poutine =-.
Woman! You know the way to my heart. Red Velvet.
The love of my life! (well second to Gene Kelly, oh and the husband-elect, of course!)
.-= Emily´s last blog ..Light Whole Wheat Bread =-.
Thank you thank you thank you!! This my all time favcorite cake, but have yet to find a recipe that isn’t super greasy or cocoa-y enough – Can’t wait to try your version!!
I would eat the entire thing in one sitting, I”ll tell that you much right now.
.-= Pink Panda´s last blog ..Fat Fish Fry =-.
Red velvet cake never has enough chocolate for me so you’re version should be right up my alley. Although I will have to stick with regular cream cheese frosting. For me the cake is more a delivery method for the frosting.
.-= Deanna´s last blog ..Chimay Braised Shortribs =-.
I have a very soft spot for red velvet cake but it’s only allowed for our anniversary around here – my husband poppa trix proposed to me when we were on vacation in new orleans 2 years ago this june, and we got married in a voodoo temple 2 days later. the cake? a red velvet one from rouse’s supermarket! but i’m totally gonna save this recipe for our anniversary and surprise him, it looks gorgeous.
.-= Tasty Trix´s last blog ..Focaccia with Tomatoes & Oregano; Plus, My First Day Back to School as a Baking & Pastry Arts Student! =-.
that is one amazing cake.. great color! I can’t wait to try one of these babies! Thanks
.-= deana@lostpastremembered´s last blog ..Cosimo de Medici’s Divine Jasmine Chocolate =-.
How could anyone say no to that! Looks and sounds sensational!
.-= Sathya´s last blog ..Upma =-.
What a lovely red velvet cake!!!
Howdyall . First,allow me to say, good page . I enjoyed reading your through your site.Just wanted to tell ya, I voted you up on stumbleupon . Have a good night
Your cake is beautiful. I made the red velvet cake from the Pioneer Woman Cooks last week, and my hubby loved it. I’ll have to give yours a try, too. Maybe I’ll make this for him for Valentines Day!
.-= Jen @ My Kitchen Addiction´s last blog ..Ten in 10 – Week 3 Update =-.
I just love the idea for the frosting, I am not a huge frosting fan in general and so any way of lightening up the frosting is excellent in my book! The additional of a vanilla bean to the recipe is also a wonderful idea, not just for flavor, but it looks great too!
I recently came across vanilla bean paste, it is about the same cost as high quality vanilla extract. While I do love using whole vanilla beans in recipes, I rarely do becasue of cost…the paste is a good compromise. (By the way, I use the Nielsen Massey vanilla bean paste).
Thanks for the great recipe!
thank you very much it is very perfect
this cake looks wonderful! i love how vibrant the cakes look right out of the oven! i made this cake for my parents’ anniversary but my cheap food coloring failed me, so we ended up with a plain ol chocolate cake haha. it tasted great though!
.-= savanna´s last blog .."junk soup" and crackly no-knead bread =-.
I love this cake. Delicious recipe. I will try it later. Thank you.
.-= Anne´s last blog ..Dum Aloo Recipe =-.
[…] Red Velvet Cake […]
[…] Red Velvet Cake | Guilty Kitchen […]
[…] Recipe for velvet cake adapted from here. […]
[…] slight skin-crawl reaction to using an entire tablespoon of red food coloring, as suggested by the Guilty Kitchen’s cake recipe, I cut the amount down to a teaspoon, so mine was more of a not-terribly dark brown. I found the […]
[…] 18. novembrim, gribējās ko tematisku. Viipsnai izcila ideja – cepam Red Velvet Cake! Izskatās tik kārdinoši, ka nevar necept. Nopirku krāsu, un prieki var sākties! Taču… […]
[…] Royale Sweetheart Cherry Cake by She Wears Many Hats Valentine Cake Decorating Ideas by I Am Baker Red Velvet Cake by Guilty Kitchen Red Velvet Cake Trifle by RecipeGirl Chocolate Overdose Cake by Beantown Baker […]
[…] cake is not red velvet cake without a lot of chocolate and espresso! CEimB Mocha Red Velvet Cake Red Velvet Cake Recipe | Guilty Kitchen __________________ Different colors, one People. -Lucky Dube […]