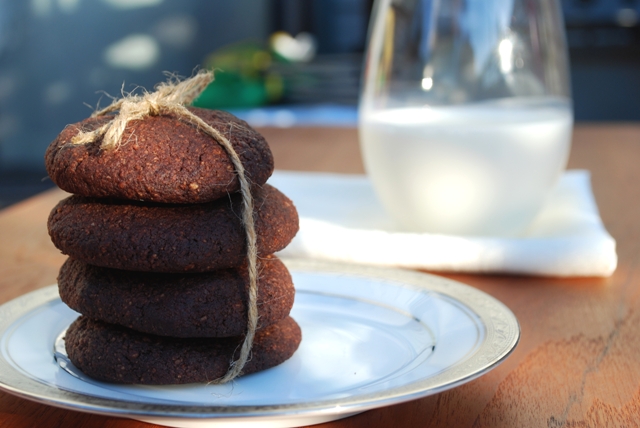
After posting my new cookie recipe the other day, I figured I’d better get to perfecting it, as it’s not quite there yet. So today, while Cohen took his long afternoon nap, I got to baking. I didn’t change much, but the additions I did add have now created the perfect cookie, The Chocolate Nutter! What, you don’t like the name? Too bad, I’m too lazy to come up with something snazzier. That will have to do for now, though I welcome your suggestions on a new name. Please feel free to suggest something.
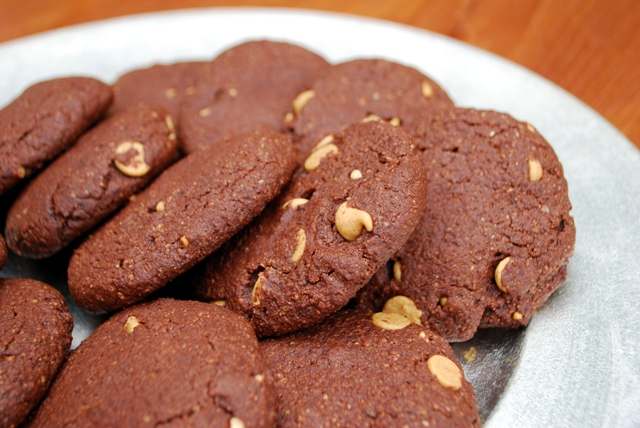
The Chocolate Nutter
1/2 cup butter, room temperature
1/2 cup natural peanut butter, chunky
3/4 cup packed yellow or brown sugar
1/2 tsp salt
2 tsp vanilla
1 egg
1/2 cup cocoa
1/4 cup whole wheat flour
1/2 tsp baking powder
1/2 tsp baking soda
1 cup almond meal
1/2 cup Peanut butter chips
1. Preheat oven to 325°F. Cream butter, peanut butter, sugar and salt. Beat in egg and vanilla.
2. Sift cocoa, flour, baking powder and soda into wet ingredients, mix well. Stir in almond meal.
3. Add PB chips and stir to combine.
4. Roll dough into 1 1/2″ balls, then flatten before placing 1″ apart on baking paper lined cookie sheet.
5. Bake for 12 minutes. Cool completely before enjoying!
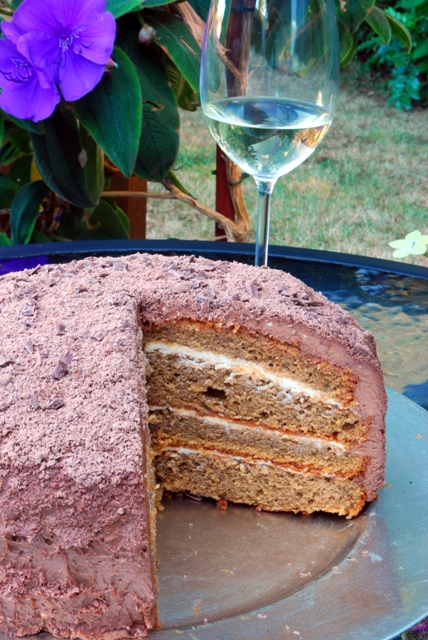
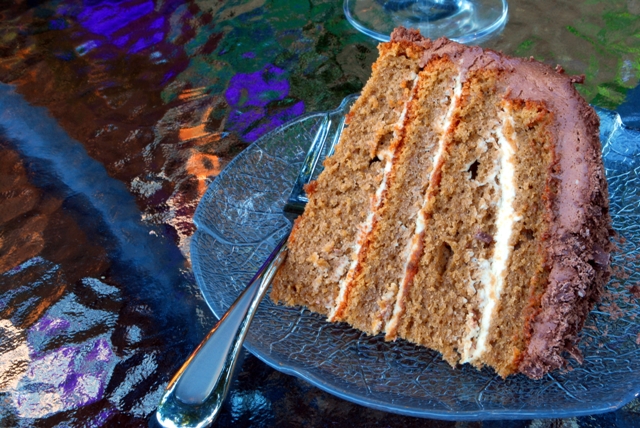
I love making cake. Love it. It’s such a fun process. Baking the cake, making the filling and frosting or ganache or glaze or whatever you want! There are so many possibilities. Which is why I offered up my powers of cake baking and divine frosting whipping for my Father in law’s __st birthday. (Left blank to respect his youthfulness).
Me: So what kind of cake are we talking about here?
FIL: Mocha
Me: That’s it? Just something mocha flavoured.
FIL: Yup.
Okay. No problem, Pssshhhht. I can so totally make anything Mocha flavoured!
So I scoured the far reaches of the intraweb. But, once again, my OCD kicked in. Every recipe was just not quite what I was looking for. Nothing is ever up to snuff for me. I have a problem, I need to tweak. And tweak I did. The following is my interpretation of a classic Italian dessert, but in a much neater form. I love Tiramisu, but it’s no cake. I much prefer a big slab o cake to dig my fork into…I need the substance. I also prefer the cake form over the original because of texture. To me, tiramisu is almost pudding like, Trifle-esque really. It’s a dressed up, fancy Italian version of good old English Trifle.
So, in working my magic, I hope that I have created a new favourite dessert for someone out there. I know I have a few fans already. Enjoy!
Tiramisu Cake
Yield: One 4 layer cake to serve 12
Prep Time: 45 minutes
Cooking Time: 30 minutes
For the Sponge:
1 1/4 cups All purpose flour
1/4 cup cornstarch
1 Tbsp. + 1 tsp. Baking powder
1/2 tsp. salt
1 1/4 cups granulated sugar
1/4 cup instant coffee or espresso powder
2 Tbsp. vanilla extract
1/2 cup + 2 Tbsp. Vegetable oil
1/2 cup water
6 large eggs, separated
1/2 cup water
1 Tbsp. sugar
2 Tbsp. instant coffee powder
Filling:
16oz container Mascarpone, room temperature
500mL whipping cream, whipped
3 tsp. instant coffee powder
1/4 cup + 2 Tbsp. Sugar
2 tsp vanilla extract
Ganache:
75mL whipping cream
150 g dark chocolate (70% cocoa solids)
1 Tbsp. instant coffee powder
1. Preheat oven to 375°F. Line the bottom of two 8″ cake pans with baking paper.Do not grease.
2. Sift flour, cornstarch, baking powder, salt and sugar into large bowl.
3. Beat egg whites in mixer until soft peaks form, then set aside.
4. Combine water, vanilla and coffee powder in medium bowl, stir until coffee is dissolved. Whisk in oil and egg yolks. Stir your wet ingredients into the dry, stirring until smooth.
5. Gently, fold the egg whites into the rest of the ingredients. Mix until completely incorporated.
6. Pour batter evenly into both pans. Set in middle rack of oven, side by side. Bake for 25 – 30 minutes.
7. When cooled slightly, run knife around edges and turn onto cooling rack. Cool completely.
8. Cut each cake into two layers (Horizontally of course).
9. For the filling: Dissolve coffee and sugar in vanilla. Set aside.
10. In stand mixer bowl, beat Mascarpone until completely smooth (you don’t want any lumps!). When smooth, slowly add whipped cream. Then add coffee, mixture. Beat until combined.
(This is completely optional, but I separated the filling into two containers. I then used one container for the filling and then added the ganache to the other container for the frosting. Creating a two-tone look. You could just not add ganache, or add it to the whole amount of filling. If you do add the ganache, melt the chocolate and whipping cream in a double boiler over low heat [watch carefully!], then stir in coffee until completely combined. Beat into cheese mixture until smooth.)
11. On a cake stand (or wherever you will be serving from), line edges with strips of wax paper. Set first layer of cake onto stand, cut side up.
12. Combine water, sugar and coffee granules. Brush onto first cake layer, but do not soak like you would for a tiramisu, the cake needs to be able to stand under it’s own weight!
13. Add thin layer of frosting, going almost all the way to edges. Repeat for next 2 layers. When you get to the last layer, brush with coffee, but no frosting.
14. You want to do a crumb coat first, before you frost your cake. So spread a very thin layer of frosting onto cake. Then frost as you wish. I had to stick mine in the fridge between layers of frosting as it was very hot in the kitchen, and the frosting began to melt.
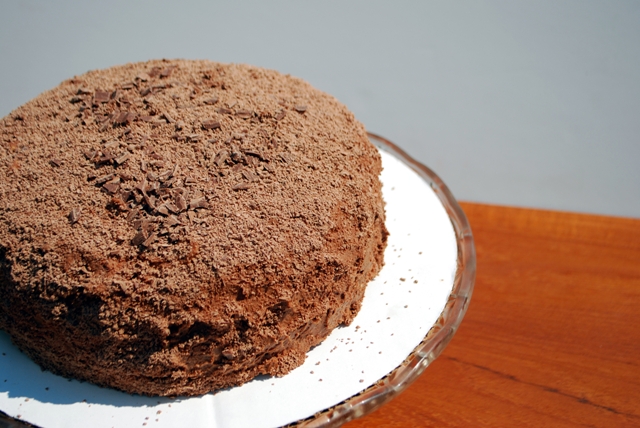
15. You can add grated or shaved chocolate to the otside of the cake if you wish! Delicious!
So I came to the realization that, I now have my own food blog, and a gazillion recipes of meals I’ve created, but I don’t really have any baking recipes that I’ve 100 % created myself. When I worked in restaurants, I never really had the chance to bake, as there was always a dedicated baker or pâtissier. Well, now that I have an audience of sorts (I hope there’s more than just my husband), I figured I’d better devise my own cookie recipe, at the very least. Cookies have to be the easiest form of baking. You can’t really wreck them, and even if they don’t turn out right, you can probably still eat the dough, or make cookie crumb crusts or something of that ilk.
So last night, I decided to tackle chocolate almond cookies, as I’ve so named them, because I have a lot of almond meal from making almond milk, and I need to do something with it. Want not, waste not!
In my “professional” opinion, I do believe that they could be better, but they are still delicious! If anything, I would add a big swirl of peanut butter (or almond butter) to the the batter before making the balls, and they would taste just like Reese’s Peanut butter cups. I will update this post later, after I’ve tried batch #2. But, so far, here is the recipe:
My first cookie recipe!
Chocolate Almond Cookies, Take 1!
3/4 cup Butter, room temperature
1/2 cup sugar
1 egg
1 tsp vanilla
1 cup almond meal
1/4 cup whole wheat flour
1/2 cup cocoa powder
1/2 tsp salt
1/2 tsp baking powder
1. Cream sugar and butter in medium sized bowl. Add egg and vanilla, beat well.
2. Stir in Almond meal and flour, mix well. Add Cocoa powder, salt and baking powder.
3. Roll dough into 1 1/2″ sized balls and flatten out on greased or parchment paper lined cookie sheet. Space 3 inches apart.
4. Bake in 325°F oven for 15 minutes. Cool completely before eating.
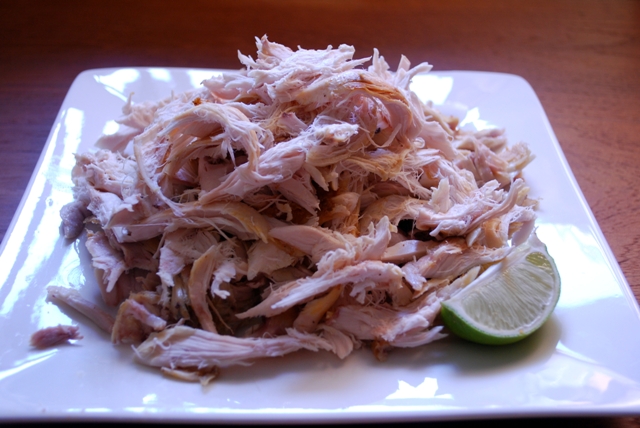
If ever there was an ingredient I love purely for it’s convenience, it would be this: Rotisserie chicken. Right…the ones you can buy at your grocery store that are all hot and ready to go. I don’t know about everywhere else, but here in Victoria, you can buy one of these deliciously moist, ready to eat chickens for $7.99 when hot, and $6.99 when cold. That’s cheaper than buying a whole, raw chicken from the meat department. Which would explain why, at around 6pm on weekdays, there is always a line up to grab one.
They are fabulous for quick meals during the week when you run out of ideas or time. I love them on the weekend too, when I can create fabulous meals out of them without having to spend over an hour roasting it myself. In this heat, there’s no way I’m turning my oven on for more than 10 minutes, unless it contains chocolate…then I may be persuaded.
Today was one of those days where I wanted to make something really tasty, but not spend the whole night in the kitchen away from my family. It is the weekend, and I do cherish the time we get to spend with each other. Besides, my husband loves these things. Who am I kidding? So do I!
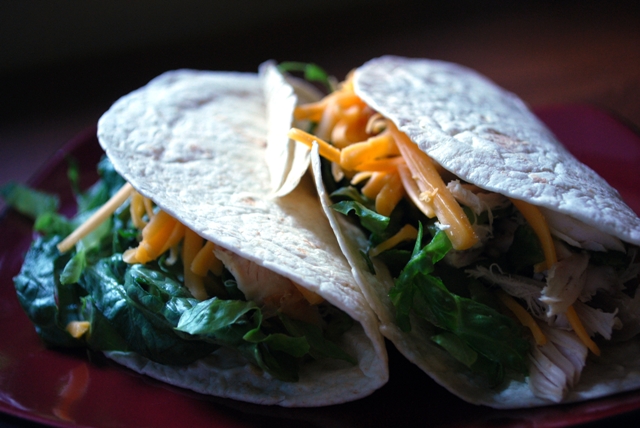
Today I felt like some kind of Mexican food, and rotisserie chicken of course. So Pulled chicken tacos are what came to mind. Very easy to make, only a little prep work, and you’ll be back to your family in no time.
Pulled Chicken Tacos with Avocado Salsa
1 precooked, cooled rotisserie chicken
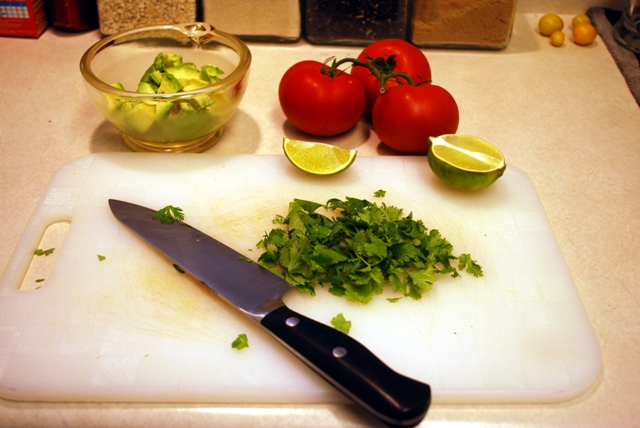
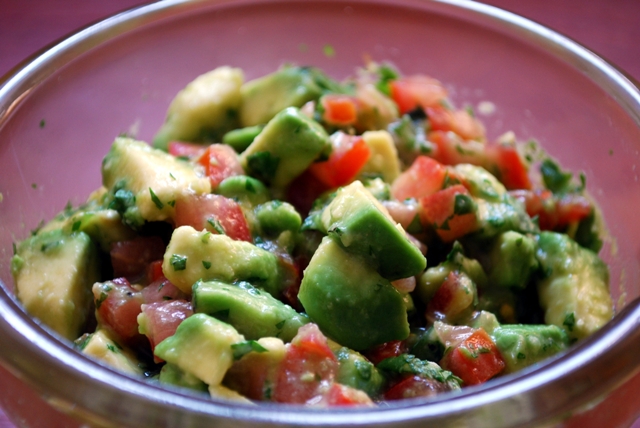
1 avocado, pitted and diced
1 tomato, diced
handful of cilantro, chopped fine
salt & pepper to taste
juice of 1/2 a lime
10 Small flour tortillas
Toppings:
Grated cheddar cheese
shredded romaine lettuce
spreadable sauce, optional (we used a Mexican Jalapeno mayo)
1. Remove all the meat from your chicken, pulling the meat apart into small pieces. Set aside.
2. In a small bowl, combine diced avocado, tomato, cilantro, lime juice and salt & pepper. Set that aside.
3. To assemble your tacos, take one tortilla, spread on your sauce of choice (or not), add a small handful of chicken, a scoop of your avocado salsa, a sprinkle of lettuce and a little handful of cheese.
4. Fold in half to make taco, repeat!
If you’ve noticed my pictures are getting better (well, I hope they are), we can all thank my Father-in-Law, Dirk for giving me his Tripod. Thanks Dirk!
Let me know what you think! I love to hear feedback!

At the end of the week, the fridge always seems kind of sad. There are empty spaces everywhere, and most of the packages and bags are down to the last occupant. Lucky for me, there were still enough eggs to make my favourite meal swap. Breakfast for dinner. It’s been a tradition for a while now to, every few weeks, make an egg dish for dinner. We don’t often have time to make eggs during the week, and on weekends we are out the door as soon as everyone has shoes and hats on. And pants of course.
There are so many ways to cook eggs in delicious fashions, that I could never say that one perticular dish is my favourite. Well, this one comes pretty close. A perfectly set white, and a still somewhat runny yolk, provide perfect fodder for the last few slices of beer bread floating around the house. The addition of fresh herbs from the garden and a little of my favourite condiment, butter, and you have an easy meal for any day of the week. Make them today for breakfast!
Shirred Eggs (AKA Baked Eggs)
Yield: Two servings
Prep Time: 10 minutes
Cooking Time: 10 minutes
Fresh herbs to taste (I had Thyme and Rosemary in the garden), chopped fine
4 large eggs
2 Tbsp milk
1 Tbsp butter
salt & pepper to taste
Chopped, cooked spinach
Slices of toast to dip in eggs
1. Preheat your broiler for 5 mintutes, placing a rack at least 6-8 inches away from it.
2. Combine herbs in small bowl, set aside.
3. Crack eggs into 2 seperate bowls, but not the dishes you will be baking them in. Set aside.
4. Place two small ramekins on a baking dish, place 1 Tbsp milk and 1/2 Tbsp of butter in each dish.
5. Place under broiler for 3 minutes, or until bubbly.
6. Sprinkle herbs and salt & pepper into dishes, pour eggs over top, sprinkle top with cooked, chopped spinach.
7. Bake under broiler for 6 minutes or until whites are just set and yolk is still runny. Remove from oven and let stand 1 minute.
8. Serve with toast for dipping.

|

Hi! I'm Elizabeth. I like fitness, bad ass tattoos, food, bacon, chocolate, taking lots of silly pictures and my spawn. Check out my FAQ for all the usual Qs or send me an e-mail and tell me all about your cat and your Aunt Sally's amazing apple pie. |


